The Curl IDE provides you with the tools you need to develop
Web applications using the Curl® language. It
includes tools for writing, debugging, packaging, and deploying
Curl applets and packages. The IDE is also integrated with the
documentation for the Curl language, letting you quickly find the
information you need to develop your application.
This document explains how to use the Curl IDE. This initial
chapter covers the basics of using the IDE and provides a quick
tutorial to get you started. The subsequent chapters offer more
detailed information on developing Web applications in the IDE.
To learn the Curl language, you should see:
- The Curl Developer's Guide which gives you an
overview of the Curl language.
- The API Reference which documents
each primitive and class in the Curl language in
detail.
On Windows platforms, you can start the Curl IDE from the
start menu. Click the start icon, then point to Programs
then click Curl IDE. When you start the IDE, the
Curl Runtime Environment starts, and the
main window appears.
You can also start the IDE by double-clicking a Curl language
project file (.cprj) in Windows®
Explorer. The IDE starts and loads the project.
On Linux platforms, the Curl sub menus are located in the Main
Applications menu. Select Applications, then Internet, and finally Curl IDE. You can access this menu
from a start icon, usually located in the lower-left corner of the
desktop. You can access a browser interface from the Start
Here icon, which is usually located near the top-left corner of
the desktop.
On Linux platforms, you can use a command-line script curl-ide-lab to start the Curl RTE and run the Curl IDE.
See
Linux Platform for information on the Linux version of the Curl
RTE.
The Curl IDE consists of a full suite of tools for developing
Web applications. These tools work together to support all your
Web application development tasks.
- The IDE main window is the window that appears when you
start the IDE. It gives you access to functionality and
information you need to build your application. See The Curl
IDE Main Window.
- The Class Browser provides a graphical view of the
relationships between classes defined in all open projects.
It gives you a quick overview of code you are working on, and
enables you to navigate to the source for any class or class
member. See Class
Browser.
- The Inspector lets you examine the state of graphic
objects in your applet. This can help you understand why your
applet appears the way it does. See Inspecting Objects.
- The Profile Viewer lets you examine the time used by
components of your applet. This can help you make your code
faster and more efficient. See Profiling Your Applets.
- The Visual Layout Editor provides a visual interface
for doing the graphical layout of your applet. See Visual Layout
Editor.
- The Documentation gives you access to the Developer's
Guide and Curl User's Guide included with the IDE.
The Curl IDE is available in two versions, Curl IDE and
Curl Pro/IDE. Curl IDE requires no license and can be
downloaded at no cost from
Curl
Inc. It enables you to develop, debug, and deploy Curl applets,
but does not include the Curl Pro features you need to develop and
deploy a large-scale, commercial application. See
Curl IDE and Curl Pro/IDE for a more detailed
description of the differences between these two versions.
You can try Curl Pro/IDE for sixty days at no cost. Simply select
Purchase and License Curl Pro/IDE from the Help menu
and click on the Start Curl Pro/IDE Trial button. A dialog
appears that asks you to confirm your choice. Click Start
to begin the sixty-day trial.
When you start the trial period, the Curl Pro features are enabled
immediately. You do not have to restart the IDE for the change to
take effect. The Purchase and License Curl Pro/IDE dialog
shows the date that the trial period ends.
Once the trial period has expired, the IDE reverts to Curl
IDE functionality, unless you purchase a Curl Pro/IDE license. You
will not be able to start another trial period on the same machine
with the same version of the IDE.
You can purchase Curl Pro/IDE licenses either as standalone
licenses generated for each machine, or as a network license for a
specified number of machines. The Purchase Curl Pro/IDE
button takes you to the Curl Web site, where you can find
information about purchasing licenses and setting up a network
license server.
When you purchase a standalone license, you send a code that
identifies your machine to SCSK Corporation. and you get back a license
code. The Purchase and License Curl Pro/IDE dialog displays
your machine code and a button to copy it to the clipboard.
Once you have purchased Curl Pro/IDE licenses, bring up the Purchase and License Curl Pro/IDE dialog from the IDE Help
menu. Click the Activate License button to bring up the
License the Curl Pro/IDE dialog where you can either
specify a license server on your network or enter the standalone
license key you received from Curl Inc. You can select a license
server from the dropdown list, or type a server name.
You can release a network license and make it available for use by
another machine by clicking the Release License button on
the Purchase and License Curl Pro/IDE dialog. A dialog
appears that asks you to confirm your choice. Click Release
to release the license. The license is released as soon as you
shutdown the Curl RTE. The machine must be able to contact the
license server when the RTE shuts down, in order to successfully
release the license.
Network licenses require that a network license server be running
and available on the network when you acquire or release a
license. The requirements for IDE network licenses are similar to
those for RTE licenses. See
SafeNet
Licensing for information on setting up a license server.
The IDE Main Window provides two arrangements for the main window
panes, the
Edit Layout and the
Debug Layout. The IDE
normally opens using the edit layout, and automatically switches
to the debug layout when a Curl applet encounters a runtime
error. When the IDE opens in response to a runtime error, it uses
the debug layout. If you stop debugging the applet, for example by
clicking the
Quit Applet button, the IDE reverts to the
edit layout. You can also switch between the edit and debug
layouts using selections on the
View Menu, or the corresponding tool bar icons.
Each layout attempts to provide the optimal arrangement of panes
for the intended task. The edit layout hides the Locals,
Expressions, and Call Stack panes. The debug layout
makes those three panes visible, reconfigures the pane layout, and
and raises the Locals and Call Stack panes, which
makes relevant debug information immediately visible. The debug
layout also hides the Errors, Search
Results, and Output panes.
The IDE retains changes you make to both layouts, so you can
customize both the
Edit Layout and the
Debug Layout.
For more information on the Curl IDE Debugger, see,
Debugging Your Applets The IDE main window enables you to manage the files in your
projects, edit source code files, and access other Curl IDE
tools and documentation. The window is divided into a number of
panes. Each pane has a title bar that contains the name of the
pane and a close control. Click on this control to hide the
pane. The following sections briefly describe the main window
panes.
The Project pane lists all open projects, and the packages,
assemblies, files, and other resources in each open project. The
manifest name for the project is the root of the hierarchy, and
all of the files belonging to the project appear under it.
You do not need to create a project in order to edit and run files
in the IDE. You can open source and resource files directly using
the File menu's Open command. The files you open
that are not part of a project appear in the Project pane under
the heading Other Files.
When you open more than one project, the IDE displays a radio button
next to the root node of each project. This button enables you to
select a current project. Operations that act on the project, such
as changing project properties or modifying deployment settings,
act on the current project. Operations you invoke through the
right-click context menu in the Project pane act on the selected
file.
Note: If a single file is used by more than one project, you should
avoid having more than one of the projects open in the IDE at a
time. If you have multiple projects open that use the same file,
the IDE may be unable to determine which project to use for
operations such as Remove Selected Item from Project.
The Definitions pane contains an alphabetically sorted list of
symbols defined in all open projects. This list offers
another way for you to navigate the source code. It is loaded from
the source code when you open a project, and is updated
whenever you change a file in a project. See
Navigating with
the Definitions Pane.
The Editor pane contains the Source Editor that lets you edit
Curl language source code. The Source Editor also lets you edit
other text-format files, such as HTML pages. The IDE can also
display some types of non-text files in the Editor, although
you are not able to edit them. For example, opening a supported
image file (a JPEG or GIF file) displays the image in the Editor
pane. For more information on editing code in the editor pane, see
Editing Curl Language Source.
The Errors pane displays any syntax errors that the IDE found
while compiling your applet. See
Syntax Errors.
The Search Results pane displays the results of
Find All
searches, which produce multiple lines of output. See
Search Menu and
Search and Replace.
The Output pane displays any messages your applet
sent to the standard output using the
output
procedure. This is an easy way to display status messages in
your applet while you are developing it.
Used in debugging, in conjunction with the
Call Stack pane,
see
Call Stack Pane Used in debugging, in conjunction with the
Call Stack pane,
see
Call Stack Pane The editor status bar is at the bottom of the IDE window. It
displays information about the Source Editor when the Editor Pane
has focus:
From left to right, the status bar shows:
- A message area that displays information, such as the
opening curly brace ({) that matches the closing
brace you have just typed.
- The line and column in the source file where the
cursor is located.
- Whether the file has been modified since it was last
saved. Two asterisks (**) here indicate that there
are unsaved changes in the file.
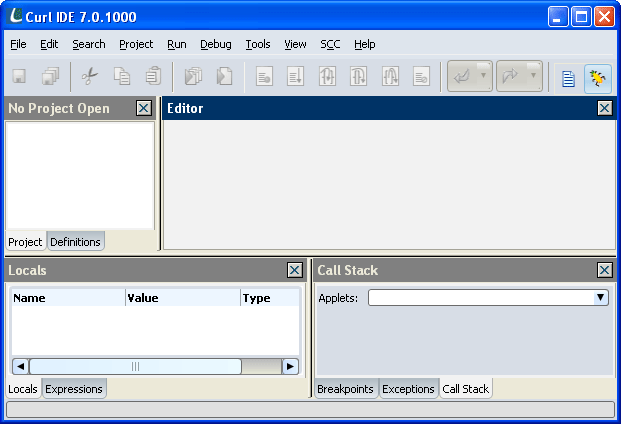
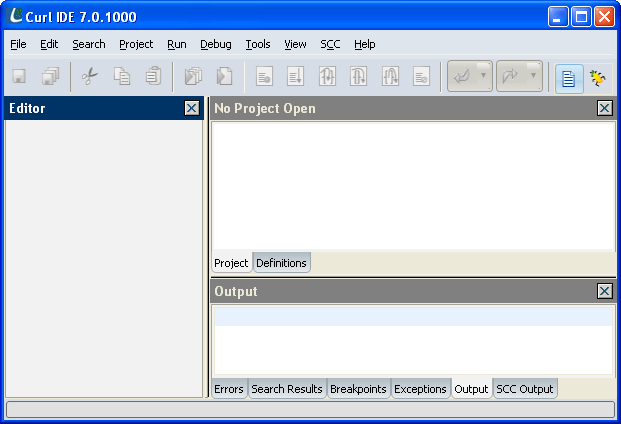
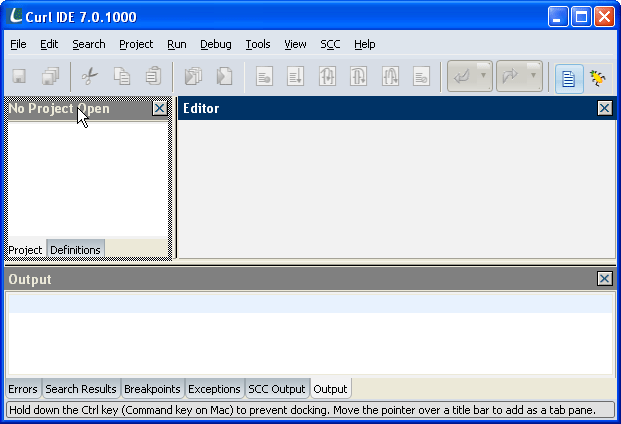
When you invoke the IDE for the first time following initial
installation, the main window appears in the following
configuration:
Note the following points about this initial configuration:
- Each of the visible panes has a title bar and a close box. The
title bar indicates which pane currently has focus and
provides a grab point for moving panes in the window
configuration. See Modifying the Window Configuration.
- The Project, Editor, and Definitions panes are organized in a
vertical split.
- The Errors, Search Results, Breakpoints, and Output panes are
organized in a tab group.
- The tab group is organized in a horizontal split.
- You can resize the window and the panes in it by clicking and
dragging the borders between them.
You can modify the main window layout to suit your preferences and
style of working. Each of the panes can have one of four states:
- docked in a in a horizontal or vertical split
- docked in a tab group; the tab group itself occupies a
horizontal or vertical split
- floating
- hidden
A variety of UI gestures enable you to shift panes from one state
to another.
You can double-click in the pane title bar to toggle the pane
between the docked and the floating (undocked) state. When you
double click the title bar of a floating pane, it returns to its
previous docked state. If the pane was previously part of a tab
group, it returns to the tab group.
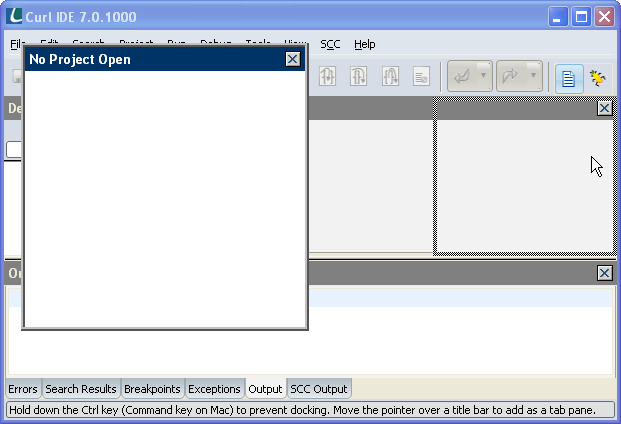
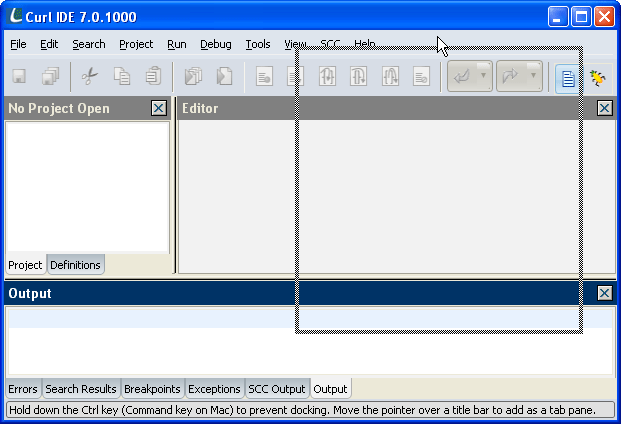
You can also undock a pane by clicking and dragging the title
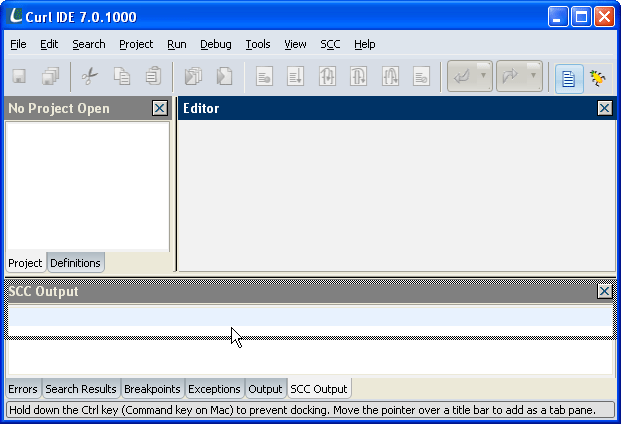
bar. The following figure shows the Editor pane being dragged into
the floating state. Note that the dark gray outline is not
contained in any existing pane.
The following figure shows the Editor pane floating above the IDE
main window.
You can drag the pane into a number of other
configurations in the window, depending on where you position the
cursor.
Vertical splitting divides the IDE window vertically. The
resulting pane sits side by side with the pane on which you drop
it. The following figure shows the Project pane being dragged to a
vertical split to the right of the Editor pane. Note that the cursor
is positioned just inside the Editor pane, on the right side of the
2 window. Also note the outline that surrounds only the right half of
the Editor pane, indicating where the pane will drop.
The following figure shows the result of this operation.
By moving the cursor just outside the IDE window, you can create
vertical splits that span the entire height of the window. The
next figure illustrates this type of split.
The following figure illustrates the result of this operation.
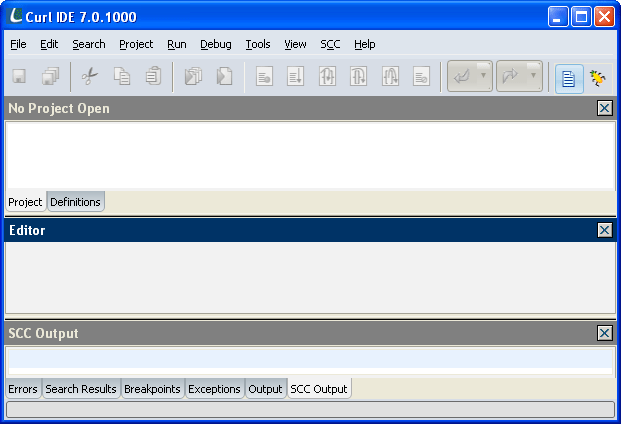
Horizontal splitting divides the IDE window horizontally. The
resulting pane sits above or below the pane on which you drop
it. The following figure shows the Editor pane being dragged to a
horizontal split below the Project pane. Note that the cursor is
positioned just inside the Output pane. Also note that the outline
surrounds only the top half of the Output pane, indicating where
the pane will drop.
The following figure shows the result of this operation.
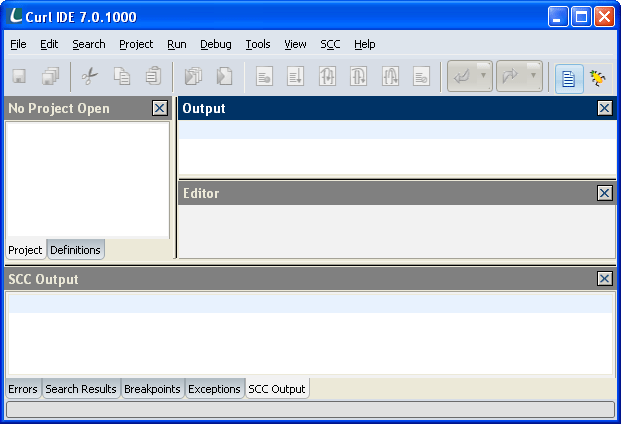
You can also create horizontal and vertical splits within an
existing pane area. For example, the following figure shows the
Output pane about to form a horizontal split with the Editor pane.
The following figure shows the result of this operation.
You can create a tab group by dragging a pane and positioning the
cursor over the title bar of another pane. When you drop the pane,
it and the pane under the cursor form a tab group. The following
figure shows the Editor pane about to be dropped into a tab group
with the Project and Definitions panes. Note that the outline
surrounds the entire Project pane.
You can remove a pane from a tab group by dragging on the tab. You
cannot float a tab group, so dragging from the tab group title bar
to a floating pane drags only the pane for the active
tab. Dragging to another docked position drags the entire tab
group. The following figure shows the Output pane being dragged to
become a floating pane.
The IDE stores your most recent layout
configuration, so it persists from one IDE session to another, and
if you reinstall the Curl software. You can use the
Restore Layout command from the View menu to
restore a previous window configuration. This command offers two
choices:
- From Last Saved restores the window configuration in
effect at the beginning of the current session.
- From Default restores the initial installed
window configuration, as shown in the previous figure.
The title bar of each pane provides a context menu that enables
you to control the docking behavior of that pane.
- Dockable means the pane can be either docked or
floated, using the UI gestures described in previous
sections. A dot to the left of the selection indicates that
this option is in effect.
- Hide hides the pane. You can make the pane visible by
selecting the name of the pane from the View menu.
- Floating means the pane can only be floated. It remains
floating regardless of how you move it around the screen. This
is useful if you want to move the pane freely around the
screen without accidentally docking it in the IDE window. A
dot to the left of the selection indicates that this option is
in effect.
The Preferences... selection on the Edit menu brings
up a dialog box that enables you to set several attributes of the
IDE.
- Character Encoding for New Files selects the character
encoding used for files created by the IDE editor. See Character Encoding Support for more information.
- Recently Used Project List and Recently Used File
List sets the length of the lists of recently used files and
projects maintained by the IDE. You can access these lists
from the File menu.
- Use autocompletion lets you enable and disable the
editor source code completion feature. See Source Code
Completion.
- Scroll to last syntax error sets the IDE to scroll to
the last syntax error when a syntax error occurs in an applet
you are developing and testing. This setting is most useful if
you use the Reload button in your browser to view
changes in your applet. In this case, the IDE does not clear
previous errors, and it can be useful to have the IDE scroll
automatically to the last error. Note that a single applet can
produce many errors, so it can still be difficult to figure
out which errors came from the most recent run of the
applet. If you use the Run button in the IDE to view
your applet, which is the recommended procedure, the IDE
clears all previous errors, and the "Scroll to last syntax
error" setting does not make as much difference.
-
Show value on hover
lets you determine whether you can view the value of
variables and expressions by holding the cursor over the
object in the
Editor when an applet is stopped at a breakpoint. The value
appears as a tooltip. You can view the value only if there
is a valid value available. If an error has occurred, you
cannot view the value.
You can view values only within valid contexts for
expression evaluation. Available values are limited to
those inside the source range of a method on the stack of
the currently stopped applet.
- Show line numbers determines whether the editor
display includes line numbers.
- Close Find Dialog on Find Next/Previous
controls whether the Find dialog closes whenever you
perform a Find Next,
Find Previous or Replace and Find Next
operation. The default setting is off. This setting is
useful if you want to set the search attributes in the dialog
and use keyboard shortcuts for other find replace operations.
- Close Find Dialog on Find All controls whether the
dialog closes whenever you perform a Find All or Replace All operation. The default setting is on.
- Show Start Page when starting up determines whether the
editor shows the Start Page when it starts up.
The Editor Preferences tab enables you to modify the appearance of
text in the IDE Editor.
- Editor Colors: enables you to select colors used for
colorization of Curl source code. Click on the color button
to open a color selection dialog.
- Editor Font Family: enables you to select the font
family used to display text.
- Editor Font Size: enables you to select the font
size used to display text.
- The preview window at the bottom of the Preferences
dialog enables you to view your changes before accepting them.
- Show print margin at column if selected,
and the current editor font is a monospace font, draws a line
in the source editor to show where the margin falls when the
file is printed. The number allows you to set the position of
this line to reflect your printer settings.
The
Preferences... dialog also enables you to set URL mapping.
Although local file access is sufficient for some testing and
debugging purposes, it is often necessary to develop
and debug an applet over an http connection. Mapping a URL to
files open in the IDE allows you to test your applets over an http
connection. The URL Mapping function can be useful when testing:
- Applets that pass query strings
- Applets that depend on the presence of local server
applications (e.g., database connectivity, server-side
technologies)
- Unprivileged applets that need network access
- Unprivileged applets that need local file access
In order to use URL mapping, you need to have access to a file
system that mirrors the http URL, such as a personal web server
on a local machine or an Intranet site on a local network.
Select the
Enable URL mapping check box in the
Preferences... dialog to map a URL to a source directory.
When the check box is selected, the two text fields are activated.
- The Map files served from URL field specifies the
http URL that you will use to test your project.
- The To source files in directory specifies the
local source directory.
Once you have successfully mapped a URL to your local source directory, the
IDE starts associating the URL with your local source files. The
following operations are all affected by the URL mapping:
Note: By default, applets load packages from the cache after the initial
download via http, even if the source code for those packages may
have changed. If you decide to map a URL, you may want to change
this setting so that your packages are resynchronized every time
the applet is loaded. To do this, select the "Force
resynchronization of all applets" setting in the RTE Control Panel
General tab. Because the main applet file (e.g. start.curl) is cached by the browser independently of the
resynchronization settings of the RTE, in order for the RTE to see
any changes made to that main file you should either use the
browser Refresh button after making a change to the main file or
have your web server immediately expire the main file.
The Class Browser is a window that shows the relationships between
classes defined in the source code. This feature is available only
in the Curl Pro/IDE version. See
Curl and
Curl Pro Products.
The Class Browser gives you a quick overview of the code, and
provides a way to navigate to the source for any class or class
member. You can show or raise the window by clicking Class
Browser on the Tools menu. When the IDE exits, it closes
the Class Browser window automatically. The IDE saves options
settings between sessions.
The Class Browser window displays a graph in which each node is a
class defined in the current project. The display shows base or super classes at the left of the window, with
their derived or sub classes to the right. The
browser display presents each node in the tree as a framed
rectangle with the class name inside it. The IDE continuously
updates the class browser display as you edit the source code in
the project.
You can also view classes that you do not have the source for, but
are used as base classes in the tree. For example, the graph can
show VBox as a base class in the tree even though you do
not have the source for VBox in the project. The class
name for a non-source class is displayed in italics. Click the
check box labeled Show All Base Classes. By default this
option is on.
You can select a node by clicking on it. You can also use the
tab or right arrow key to move the
selection to the right and the shift+tab or
left arrow key to move the selection to the
left. Press enter or double-click to open the source
file for the selected class in the IDE Editor. If the class is not
defined in a source file in the current project, the IDE looks up
the class name in the API documentation as if you had used
F1.
Right-click on a node in the tree to display a list of members in
the class. The members are sorted into two groups; field-like
members are shown first, followed by procedure-like members. The
items in each group are sorted alphabetically. The type of the
member is indicated with the same icon images used in the Definitions pane. Selecting a member from this
list opens the source for this member in the editor. The member
list shows only members defined in the class, not inherited
members. This list is not available for classes not defined in the
current project.
If you enter a symbol name in the text field labeled Mark
Symbol, the class browser draws a heavy outline around the names
of classes that contain a symbol with that name. Click on the
print button to print the contents of the class browser window.
If you hold down the ctrl key, the cursor changes to
an "open hand" cursor. Clicking and dragging anywhere within the
Class Browser window causes the window contents to scroll in the
direction of the drag. If you release the ctrl key,
The window continues to scroll until you release the mouse button.
By default, the graph shows the "leftmost" derivation tree. The
"leftmost" derivation is the tree created by considering only the
leftmost class in every {inherits ...} clause.
If you click the check box labeled Show Multiple
Inheritance, the Class Browser draws lines that indicate all the
inheritance relationships. The structure and layout of the graph
do not change. By default this option is off.
- New or ctrl+n creates a new file. See
Creating New Files.
- Open or ctrl+o opens an existing file.
- Open Url opens a source file from the Web.
- Close filename or ctrl+w closes
the named file.
- New Project or ctrl+shift+n creates a new
project. See Creating a Project.
- Open Project or ctrl+shift+o opens an
existing project. This command opens the file open
dialog. Browse to the directory that contains the project and
select the project file. On Windows systems, you can
double-click on a Curl IDE project file in Windows Explorer
to open the project.
- Close Project closes the current project. You are
prompted to save unsaved changes in any file in the project.
- Save or ctrl+s writes the
contents of the currently open file
to the disk. If you have not saved the file before, Save acts as Save as and prompts you for a location
and a file name for the new file.
- Save as saves the file using a different file name or
location. The Source Editor prompts you for a new location and
file name to use to save the file.
- Save all or ctrl+shift+s saves all open files.
- Revert reads the file contents stored on the disk
into the editor, discarding all changes since the last time
you saved the file.
- Print or ctrl+p prints a file. When you
print source code from the Source Editor, text lines that are
longer than the width of the page are cut off at the right
margin. The exact cutoff point varies depending on the fonts
and printers you use. You should try to keep line length below
a reasonable limit. If necessary, you can print out source
code using landscape format.
On Linux
platforms, the Curl RTE uses CUPS for printing. Please visit
LinuxPrinting.org CUPS Quick Start for more information. - Properties or alt+enter opens the Source File Properties dialog, which enables you to examine
the character encoding. See Character
Encoding Support.
- Recent Projects provides a list of projects recently
opened in the IDE. You use the Preferences... command
on the Edit menu to set the length of this list.
- Recent Files provides a list of files recently opened
in the IDE. You use the Preferences... command on the
Edit menu to set the length of this list.
- Exit closes all open files and exits the IDE. The
IDE prompts you before closing a file containing unsaved
changes.
Opening a non-text file in the IDE does not load the file in the
Source Editor. If the file is one the IDE can display, such as
standard graphics files, the IDE displays it in the editor pane.
If the IDE cannot open or display the file, it displays a message
in the editor pane.
If you have unsaved changes to a file and you attempt to exit the
Curl IDE, it prompts to save your changes before the
closing the editor.
Note: You can open files hosted on Web sites. However, since Web servers
do not support writing a file via the HTTP protocol, if you want
to save the file, the IDE prompts you for a local directory and
file.
- Undo or ctrl+z reverses recent editing
changes. Each time you click Undo the editor
progressively steps back through changes you have made. The
editor maintains an undo list of approximately your most
recent 100 changes.
- Redo or ctrl+y reinstates editing
changes you have reversed with Undo. Each time you
click Redo the editor progressively steps forward
through changes you have undone. The editor maintains a redo
list of all the changes you have reversed with Undo.
- Cut or ctrl+x removes selected text
and copies it to the clipboard.
- Copy or ctrl+c copies selected text to
the clipboard.
- Paste or ctrl+v writes the most
recently selected text from the clipboard into the file,
replacing any currently selected text.
- Delete removes selected text without copying it
to the clipboard.
- Select All or ctrl+a selects all the
text in the currently open file.
- Go to Line or ctrl+j positions the
cursor at the beginning of the specified line. Enter the line
number in the Go to Line dialog.
- Go to Next or ctrl+] navigates to the
next file location in the list maintained by the IDE Editor.
Locations are added to the list when you show or scroll a file
with a UI operation other than using the scroll bar, keyboard
navigation, or mouse click. For instance, operations such as
Goto Line, Show Definition, and Show
Error all add locations to the list.
- Go to Previous or ctrl+[ navigates to
the previous file location in the list maintained by the IDE
editor.
- Fix Indent or tab applies appropriate
indenting to the selected lines, or the current line, if none
are selected.
- Comment Selection or f8 adds a comment
string, ||-- to the beginning of the selected lines.
- Uncomment Selection or shift+f8 removes
a comment string, ||-- from the beginning of the
selected lines.
- Balance Curly Braces or ctrl+b selects
everything from the cursor position to the nearest set of
enclosing curly braces {, including the braces.
- Show Completions or ctrl+space
- Split/UnSplit Editor Pane splits the editor pane
horizontally into two sub-panes, or restores a single pane if
the pane is already split. It is available only when the editor
pane has focus. Click and drag the panel divider to resize the
panels.
- Switch Editor Pane if you have split the editor pane
with Split Pane, this command moves the cursor to the
other sub-pane.
- Show Open Files opens the Open Editor Files
dialog, which contains a list of complete path names for all
files open in the editor. You can select files in the list and
use buttons in the dialog to activate, save and close selected
files.
- Next Editor or ctrl+pgdn navigates to
the next tab in the IDE Editor pane.
- Previous Editor or ctrl+pgup navigates
to the previous tab in the IDE Editor pane.
- Preferences opens the Preferences dialog
box. See Setting IDE
Preferences.
- Find or ctrl+f opens the Find
dialog. See Search and Replace
for more information on the fields and controls on this dialog.
- Find Next or ctrl+g searches forward in
the file for the next occurrence of the find string.
- Find Previous or ctrl+shift+g searches
backward in the file for the next occurrence of the find
string.
- Find Definition or alt+f12 opens the Find dialog with selections appropriate for searching
definitions. Sets the Look in field to Definitions,
the search type to Fragment and Match case to
true. Unlike Find or Replace, the starting pattern is not the
current selection but the Curl identifier at the cursor
location in the current buffer. If the cursor is not at an
identifier, the selection is empty.
- Go To Definition or f12 is like Find
Definition, except that this command goes immediately to the
first match without actually bringing up the find dialog. If
the search pattern is empty, behavior is the same as Find Definition.
- Replace or ctrl+h opens the Find dialog
with the replacement string field visible.
- Replace Current or ctrl+r replaces
the current instance of the find string with the
replacement string.
- Replace & Find Next or ctrl+shift+r
replaces the currently selected match for the find string, and
then searches for the next instance of the find string in the
file.
- Find All or f3 clears the Search
Results pane of any previous search output and writes each
line that contains a match to Search Results pane with
the found string highlighted. If the find string occurs more
than once on a line, the IDE writes a separate result line for
each occurrence. The scope of the search is determined by the
Look in field in the find dialog. See Setting Search Scope.
- Find All Append or shift+f3 like Find All except that the IDE appends new results to Search Results pane instead of clearing the pane first.
- Next Search Result or f2 selects the item
in the Search Results pane that is below the current
item.
- Previous Search Result or shift+f2 selects
the item in the Search Results pane that is above the
current item.
- Stop Search or ctrl+f3 stops the current
search.
-
Add File Resource brings up a file open dialog
that you can use to add files to the project. You can
control-click files to select multiple files to add to the
project at once.
You cannot add IDE buffer contents to a project until you
have written the buffer to a file. Files loaded in the IDE
via http, (except URL mapped project files see
Changing
Project Properties) and files created when you select
Empty Editor Buffer from the
New File
dialog exist only in IDE buffers until you save them.
- Add Directory Resource opens a window that enables
you to browse for an existing directory, or create a new
one. The directory you select is added to the project.
- Add Package brings up a file open dialog
that you can use to choose a package. The file you select
must be a Curl package file. See Packages.
- Add Delegate-to brings up a dialog that enables you
to enter a URL to a manifest file. You can use the Browse... button to browse for a manifest file. See Manifests
- Remove Selected Item from Project removes the
selected item from the currently open project. The item is
listed under the Other Files node.
- Current Target displays a popup menu that lists all
available deployment targets for the current project and
indicates the currently selected target.
- Edit Target Settings opens the Project
Properties dialog with the Targets tab selected. See
Deployment Targets.
- Edit Component Target Settings opens the Component Target Settings dialog on the selected
component. See Target Settings
- Show/Hide Component Target Settings toggles
visibility of the target settings indicators. When indicators
are visible, they appear to the right of each file name.
- Change API Version changes the API version used for
this project, and automates the updating of heralds in source
files and the VLE runtime file.
- Properties opens a Project Properties dialog
with the General tab selected. See Changing Project
Properties
- Deploy deploys the project to the current deployment
target according to the target settings. See Deploying Projects
-
Deploy for OCC in addition to everything the Deploy command does, creates a Curl archive file (.car) appropriate for an application that supports
Occasionally Connected Computing (OCC.)
- Run Project or f5 runs your project in
your default browser, loading the project start file
first. See Changing Project
Properties for information on setting the start file.
- Run Project in New Window or shift+f5
runs your project in your default browser, using a new window.
- Run filename or ctrl+f5 runs
the currently selected file in your default browser.
- Run filename in New Window or ctrl+shift+f5 runs the file you are currently editing in your
default browser, using a new window.
- Continue or f6 starts running the Curl
applet. It will not be stopped again unless it encounters an
error, an uncaught exception, or a breakpoint.
- Continue to Line or ctrl+10 starts running
the Curl applet. It runs until it reaches the line where the
cursor is currently located.
- Stop or shift+f6 stops execution of the
Curl applet on entry to any debuggable procedure or method in
the applet. Note that code loaded from a .pcurl file
is not debuggable by default, even if other code in the applet
is debuggable.
- Step In or f11 executes the next
statement in the Curl applet. If the next statement is a
procedure call, then the Debugger will move to the
procedure and execute its first statement.
- Step Over or f10 executes the next
statement in the Curl applet. If the next statement is a
procedure call, then the procedure is allowed to run without
stepping through it. The Debugger will stop the applet again
when the procedure call returns.
- Step Out or shift+f11 executes the Curl
applet until the current block of code exits. For example, if
the current statement is within a procedure, then the Debugger
will run the applet until the procedure returns. The Debugger
will halt the applet at the first statement after the block.
- Quit Applet or ctrl+f6 quits the applet
and closes the debugger window.
- Set/Remove Breakpoint sets or removes a breakpoint
on the line where the cursor is positioned in the IDE Editor
pane. Other breakpoints are not changed.
- Enable/Disable Breakpoint enables or disables a
breakpoint on the line where the cursor is positioned in the
IDE Editor pane. Other breakpoints are not changed.
- Copy Stack Trace copies the contents of the Call Stack pane. This is useful if you want to include the
stack trace in an email message or other document.
- Show Expression Context is enabled if you have selected
exactly one row in the Expressions pane. The command sets the
selected frame in the Call Stack pane to the frame that
was selected when you entered the expression. It also resets
the contents of the Locals pane and the Editor
pane as if you had selected the stack trace frame manually.
- Copy As OBJ copies a value from the IDE Locals
or Expressions pane as an OBJ expression. This
command is enabled if exactly one row is selected in the Expressions or Locals pane and the value has the form
[variable-name @0xnnnnnnnn]. It puts {OBJ
0xnnnnnnnn} on the clipboard.
- Copy Name To Expressions creates a compound name from
an expanded item and its parents and writes that name into the
empty last row of the Expressions pane and raises that
pane. This command is enabled only when exactly one row is
selected in the Locals pane. See Locals Pane for more
information and examples.
Note: The
Visual Layout Editor is the only item enabled on this
menu if you are running the Curl IDE version. The other
items provide access to features supported only in the Curl Pro
IDE version. See
Curl and
Curl Pro Products.
- Hide Active Pane hides the currently active
pane. Information displayed or files open in the pane are
unchanged. Selecting this menu item has the same result as
clicking the close icon at the right side of the pane title
bar.
- These menu items each make the named IDE pane active, and make
it visible if it was hidden. A bullet to the left of the menu
item indicates that the associated pane is currently
visible. See The Main
Window Panes.
- Project
- Editor
- Definitions
- Errors
- Search Results
- SCC Output
- Breakpoints
- Exceptions
- Output
- Call Stack
- Locals
- Expressions
- These menu selections choose the debug or edit layout. See
IDE Layouts
- Restore Layout see Restoring Window
Configuration
Note: Because source code control is supported only by the Curl Pro/IDE
version, the
SCC Output item is disabled if you are running
the Curl IDE. See
Curl and
Curl Pro Products.
The IDE
SCC menu provides an interface to supported source
code control systems. Many of the commands invoke dialogs from the
user interface of the system you are using. For more information
on Curl IDE support for source code control, see
Source Code Control. Because source
code control is supported only by the Curl Pro/IDE version, the
items on this menu are disabled if you are running the
Curl IDE. See
Curl and
Curl Pro Products.
- Get Latest Files synchronizes files in your workspace
with the associated code repository.
- Refresh File Status ensures that the file status
displayed by the IDE reflects current status in the source
code control system.
- Check In checks in the selected file. Brings up a
dialog which provides space to enter check-in comments.
Clicking OK in this dialog invokes the check-in dialog
of the associated source code control system.
- Check Out checks out the selected file. Brings up a
dialog which provides space to enter check-out comments.
- Undo Check Out returns the selected file
to its pre-check out status. Discards any changes.
- Show Differences shows differences between your local
working copy of the file, and the version in the code
repository.
- Show History invokes the revision history dialog of the
associated source code control system.
- Show SCC Log displays the SCC Output pane in the
IDE. This pane displays log messages generated by the
associated source code control system.
- Settings opens the Project Properties dialog
with the Source Code Control tab selected. See the
section Source Code Control in
Changing Project Properties.
If you have selected the project instead of a file, the Check In, Check Out, and Undo Check Out operations
apply to all files in the project. The dialog box provides a list
of files, and enables you to select from the list.
The Check In, Check Out, Undo Check Out,
Show Differences, and Show History menu items apply
to either the selected file, if the project pane has focus, or the
active Editor file, if the Editor pane has focus. If neither of
these panes has focus, these menu items are disabled.
This menu offers the same choices as the
Help menu for the
Documentation Viewer. See the
Help Menu section in
the Curl Developer's Guide.
The Source Editor tool bar provides quick access to a subset of
the menu commands. The following table summarizes the tool bar
buttons and their associated commands.
| Icon | Menu | Selection | Notes |
|---|
|
| File | Save | |
|
| File | Save All | |
|
| Edit | Cut | |
|
| Edit | Copy | |
|
| Edit | Paste | |
|
| Run | Run Project | shift+button to run in new browser window. |
|
| Run | Run "filename" | shift+button to run in new browser window. |
|
| Debug | Go | |
|
| Debug | Stop | |
|
| Debug | Step In | |
|
| Debug | Step Over | |
|
| Debug | Step Out | |
|
| Debug | Quit Applet | |
|
| Edit | Go to Previous | |
|
| Edit | Go to Next | |
|
| View | Edit Layout | |
|
| View | Debug Layout | |
The
Find,
Find Definition and
Replace
commands on the
Search menu all open the
Find
dialog. The dialog provides the following fields, which enable you
to specify a number of search parameters. Some fields store values
you have used. See
History
Boxes. The IDE also supports
Incremental Search.
The find dialog provides the following controls to specify search
terms and the style and scope of the search.
- Find what enables you to specify the find string. Text
selected in the editor pane when you open the Find
dialog becomes the default find string.
- Show/Hide Replace shows and hides fields and buttons
used for replace operations.
- Replace with is visible only when you have clicked
Show Replace. It enables you to specify a replace term.
- The following four radio buttons determine how the find string
is interpreted.
- Fragment searches for the find string as a
substring. For example, searching for "book" as a
fragment would find it in "bookcase".
- Identifier searches for given full Curl
identifier. For example, searching for "book" as an
identifier would find it in "book.case" but not in
"book-case".
- Word searches for the find string as a word,
which means that the find string must be preceded and
followed by non-word characters. Word characters are
those recognized by the \w regular expression
wildcard. See Regular Expressions. As a
rough guideline, word characters are letters and
numbers. For example, searching for "book" as a
word would find it in "book.case" or "book-case"
but not in "bookcase".
- Regular Expression searches for the find string
as a regular expression. See Regular Expressions.
When replace is used with a regular expression, the
replace template has the same syntax as in the
procedure regexp-subst.
- Match case makes the search case sensitive. This
setting also applies to incremental searches, which otherwise
do not use the Find dialog settings. See Incremental Search
- Look in enables you to specify the scope of the
search. See Setting Search Scope
- The directory field and Browse button appears only when
you are searching files in a directory. Type a path to a
directory or use Browse to browse the file system.
- File types enables you to limit a directory search to
specific file types.
The selection you make in the Look in field determines what
file or set of files the IDE uses for the search.
- Definitions limits the search to all files that
contribute to the content of the Definitions pane,
which is all files in the current open project, plus any
open non-project files.
- Current Buffer limits the search to the current active
buffer. When you are using this scope, each Find Next
or Find Prev action starts searching from the current
cursor position in the buffer. All other search scopes can
involve multi-file searches, and process the files in a fixed
order.
- Open Files limits the search to files currently open in
the IDE Editor.
- Project limits the search to files in the specified
project. If you choose this scope, fields appear that enable
you to select the project and specify file types.
- Directory limits the search to files in the specified
directory, not including subdirectories. If you chose this
scope, fields appear that enable you to select the directory
and specify file types.
- Directory and Subdirectories limits the search to files
in the specified directory, including subdirectories.
The combo boxes used for the find and replace patterns, and the
directory name and the file type for directory searches, all
remember past values. The controls add a value to the list when
the IDE performs the search operation, and list most recently used
entries first.
When you select from the search pattern list, the dialog
restores the values of the Fragment, Word, Identifier, Regular Expression, and Match case that
were in effect for that search.
Most of the dialog's state is persistent for a single session.
The following elements of the dialog are persistent across
sessions:
- the position of the window
- the width of the window
- the match case setting
- the five most recent history entries for the combo boxes that
maintain history; see History Boxes. The list for the file types box always includes
a set of standard choices.
The find dialog provides button controls that enable you to
perform search actions. Some buttons on the dialog duplicate
functions from the
Search menu. See
Search Menu.
- Find Next like the Find Next command.
- Find Previous like the Find Previous
command.
- Find All/Find All Append like the Find All
command, or like Find All Append if you press
shift. Note that the button label changes when
you press shift.
- Replace like the Replace Current command.
- Replace & Find Next like the Replace & Find Next
command.
- Replace All automatically replaces every remaining
instance of the find string with the replacement string
without prompting you further. Lists all lines containing
replaced strings in the Search Results pane.
- Stop like the Stop Search command.
- Close closes the Find dialog.
Searches can "wrap-around" after hitting the end. That is, after
doing Find Next and getting the "No more matches" popup, the Find
Next command may be repeated to search from the beginning of the
search domain. If the search domain is the current buffer, this
wraparound behavior also applies to Find Previous.
- Enter pressed from anywhere in the search dialog
has the same result as clicking the currently selected command
button, which is usually Find Next.
- ctrl+h brings up the dialog with the replace
controls shown. Hitting Ctrl-H when the Find Dialog is
already active, toggles the display of the replace controls.
- esc closes the dialog.
- The OK button in the "no more matches" popup dialog may be
pressed not only using Enter, but also with ctrl+g or ctrl+shift+g. This allows you to
continue to keep hitting ctrl+g for wraparound
searches without having to switch to Enter to dismiss the
popup.
This section gives you a brief tour of the tools, and some of the
Curl language, by showing you how to create a simple
applet. You'll see all of the steps that go into creating a Curl
applet, from creating a project to preparing your applet for
distribution. Initially, the applet is the time-honored
Hello World!
program. Later sections show you how to
extend this applet using the Curl language's text formatting and
object-oriented features.
Even though your first applet is simple, consisting of a single
source file, creating a project for your applet helps you later,
when you are ready to upload your applet to a Web site.
To create a project for your applet:
- On the File menu, click New Project. The
New window appears with the New Project tab selected.
- In the New window, select Applet Project to indicate
you want to create a Curl applet, rather than one of the
other types of projects. This selection affects the files
that are automatically generated for your project, and
some project settings.
- In the Manifest Name field, type a manifest name for
your project.
- In the Directory field, type the name of the directory
in which the IDE should store the project. If the directory
does not exist, the IDE prompts you to confirm that it should
create the directory. You can also click Browse to
browse for a directory.
- You do not need to change the default values contained in the
API version field. The API
version field indicates which version of the Curl API your
applet works with.
When you click OK, the IDE creates your project and the
Curl language source files to support it.
When you create a new applet project, the IDE creates a
project file called project.cprj, a project manifest file
called manifest.mcurl and a Curl language source file,
called start.curl, which is listed under the manifest name
in the Project pane.
Notice that this file name start.curl is in bold. This
means that start.curl is the project's start
file. It is the file that the runtime loads first when running
your project via the Run Project command. It is not
necessarily the only file in your project that can be run.
Double-clicking any editable file in the Project pane loads it
into the Source Editor. If you double-click a file that the IDE
cannot edit (such as graphics files) the IDE displays them in the
editor pane, if it understands the file format. You can open the
project manifest file by double-clicking on the manifest name in
the Project pane. Note that the manifest name you supplied appears
in the
manifest declaration at the top of the file.
When you open start.curl in the Editor, you see some code in
the file that the IDE has automatically generated for you:
{curl 8.0 applet}
{applet manifest = "manifest.curl"}
In the
example above the herald lets the runtime know:
- The first line of code is called the herald. It
tells the Curl RTE that this is a
Curl language applet file, and gives the API version number
the applet is designed to run on. See Heralds
- The third line is the applet declaration. It
specifies the name of the component manifest for the applet,
which is also the manifest for this project. See Manifests
If you are using a character encoding other than utf8
that cannot be indicated with a byte order marker, the IDE adds an
additional line of code to any file it creates for you. This line
specifies character encoding for the file, and looks like this:
{curl-file-attributes character-encoding = encoding}
Where
encoding is a character string indicating the
character encoding used for the file. For more information, see
Character
Encoding. The encoding used is the default character encoding in
effect when the file was created. For information on setting the
default character encoding, see
Setting IDE Preferences.
The Source Editor in the Editor pane is similar to other text editors
you have probably used in the past. You can move around the file
using the arrow keys, home, end,
page up, page down, and by using
the mouse. Some of the more useful editing keys in the editor
are:
| Key Sequence | Action |
|---|
| tab | Reformat the current line of code. |
| Ctrl+x | Cut marked text. |
| Ctrl+c | Copy to clipboard. |
| Ctrl+v | Paste contents of clipboard. |
| Backspace | Delete character to the left of the cursor. |
| Delete | Delete character to the right of the cursor. |
| ctrl+k | Delete to the end of the line. |
| Ctrl+z | Undo last operation. |
| Ctrl+y | Redo last undone operation. |
| F8 | Comment out selected region. |
| shift+F8 | Uncomment commented-out selection. |
| ctrl+tab | Insert eight spaces. |
The Source Editor has some features specifically for editing Curl
source. For more detailed information on the Source Editor, see
Editing Curl Language Source.
Comments are messages you add into your code that do not appear in
the output of your applet. Commenting your code is always good
practice. Even for a short, simple applet like this, it is a good
idea to identify what the applet is supposed to do and who wrote
it.
In the Curl language, comments follow two vertical bar
characters (||). Everything on the line following these
characters is considered a comment, and is ignored by the runtime
when interpreting the applet.
Add some comments to your applet by moving the insertion point to
a blank line, and typing the following:
|| My First Applet
|| By Your Name Here
|| Date: Today's date
Press Enter at the end of each line.
Notice that after you type the second vertical bar, the text on
the line turns green. The Source Editor recognizes that you are
typing a comment, and color codes it so that it stands out. The
editor also color codes other elements in Curl language source
code.
To start off with, the content of your applet is going to be very
simple. Press enter several times to move the cursor
to a blank line below the comments, then type:
Hello World!
Yes, that's it! Any text in your file that is not a comment or
enclosed by curly braces is treated by the runtime as text
that should be displayed. Normally, you use text formatting
procedures so you can control the appearance of the text. To begin
with, however, this is good enough.
Before you can run your applet, you need to save the start.curl file you have edited. Use the File menu's Save command or type ctrl+s to
save your file. If you do not save your file before trying to
run your project, the IDE prompts you to save it.
Once you have saved the file, you can run your project to see the
applet in action. Click Run Project on the tool bar. Since
the start.curl file is the project's start file (not to
mention the project's only file) running the project causes the
runtime to elaborate the code you have written.
When you click Run Project, a browser window opens to display
your new applet.
Congratulations! You've written your first Curl applet!
Now that you have created a basic applet, you can expand on it,
and learn a bit more about the IDE while doing so.
Try adding some more text to your applet, this time using one of
the basic text formatting procedures. These procedures are similar
to the markup commands in HTML.
As mentioned earlier, statements in the Curl language are enclosed
in curly-braces ({ and }) to set them off from surrounding
text. The text formatting commands you type begin with a
curly brace.
Press enter several times to move the cursor to a
blank line below the last line in your applet. You
can use blank lines to separate elements in your source code; the
runtime ignores them. Now, start the text format command
by typing:
{paragraph
and press enter at the end of the line.
As you complete typing paragraph, it turns
purple. This is another of the Source Editor's highlighting
features. Source Editor uses a purple color for all of the
standard procedures that it recognizes.
When you press enter at the end of the line, the
cursor not only moves to the next line, but also moves to the
right so it is indented under the {paragraph
statement. This is caused by the Source Editor's automatic
indenting feature. This feature helps you organize your source
code, and makes it easier to read. In this example, indenting
makes it easier to see that the next lines you type are within the
paragraph text procedure.
As you edit source code, you may find that the indentation
is incorrect. To have the editor automatically re-indent the line
of code for you, press tab.
Now, add the contents of the paragraph by typing:
Time is running out!
Now, close the text format by pressing enter, then
typing a right curly brace (}). To make your applet's source
code easier to read, you can put closing braces on a line by
themselves, unless the entire expression is on a single
line. However, this is not a requirement. Notice that the closing
brace lines up vertically with the opening {paragraph
statement, which helps you see that it closes the statement.
As you type the closing brace, notice that the matching opening
brace briefly turns red. This
flashing
helps you keep
track of which expression you are completing. If the wrong brace
flashes (or none flashes at all), then you may have an extra or
missing closing brace in your source code. You
can also see what the close brace matched by looking at the status bar.
See
editor status bar.
Since you have completed the statement, you can save your applet
again and click Run Project to see the results of your changes.
There are other text formatting procedures you can use to format
text differently. For example, the
italic text procedure makes
text italic and the
bold text procedure makes it bold. Text
procedures can contain one another as well. If the two formats do
not conflict, the text uses both styles.
Add another paragraph of text using some text formatting. Press
enter a few times to put at least one blank line
between the bottom of the previous paragraph expression and the
cursor. Then, type:
{italic There's not a moment to {bold lose!}}
Since the entire expression fits on a single line, don't bother
putting the procedure names and closing braces on their own line.
You can save your applet again and run it to see the effect that
your formatting has on the text.
To learn more about text formatting using the Curl language,
see
Text
Formatting.
The Curl language is a full-featured programming language.
In the next few steps,
you use a few of the Curl language's standard classes to let the
user know how many days are left in the year. If you are not a
programmer, you may wish to skip this section and learn about
deploying your applet instead.
The Curl language is object-oriented, meaning that most of the
applet's data and the instructions for manipulating it are
combined together into a bundle called an object. Much of your
applet's code involves creating and manipulating objects.
You create an object using a class. Classes are basically
templates for objects, which defines the type of data the object
can store and the programming code that can be used to manipulate
the object. The Curl language comes with many classes
already defined for you.
To create an object in the Curl language, you enclose the
name of the class in curly braces. Usually, you also create
an object reference variable at the same time. This variable acts
as a handle for the object, letting you manipulate it later.
On a blank line at the bottom of your applet's source code, type:
{let today:DateTime = {DateTime}}
The code you typed in is enclosed in curly-braces, since these are
Curl language expressions. The content of the line, from
left to right is:
- let is the start of an expression that defines a variable.
- today:DateTime creates an object reference
variable. today is the name of the object reference, and
DateTime tells what kind of variable it is (a
reference to a DateTime object, in this
case). Anywhere you use the variable today in
your applet, you are accessing the DateTime
object to which you have assigned the variable.
- The equal sign makes the today object reference
variable refer to the newly-created DateTime
object. This means that statements that refer to today are
manipulating the object.
- {DateTime} is a call to a constructor for the
DateTime class. This is similar to the call to the text
formatting procedure you used above to create a paragraph. A
constructor is a procedure that creates an object from a
class, and returns it.
Now that you have a
DateTime object, you need to know
what you can do with it. Fortunately, the IDE comes with
documentation that explains the standard classes, procedures, and
statements in the Curl language. The best source of
detailed information about classes is the API Reference Manual.
To find API Reference information about
DateTime, you can
select the text "DateTime" in the IDE Editor, and press
f1. You can also click the
Index tab in the
Navigation pane and type
DateTime in the text entry
field. The index display moves to the first matching entry. You
can distinguish API entries from Developer's Guide entries by the
language component that appears in parenthesis at the end of each
API entry. You can also use the search function to find API
Reference information. For an explanation of what appears in API
Reference entries and how you can use it, see
The API Reference
Manual.
The Source Editor also provides source code completion, which can
help you use the Curl language API. See
Source Code Completion By reading the
DateTime entry, you can see that this
class is used to represent a date and a time. You can use objects
of the
DateTime class to store and manipulate dates and
times.
If you click the blue triangle under the section marked
Default Constructor, you see a description of the
constructor procedure you just called to create the
DateTime object. Like most classes,
DateTime lets you
pass parameters to the constructor, which let you set properties
of the object you are creating.
If you do not pass parameters to the
DateTime constructor,
it creates an object that represents the current date and
time. You can pass parameters called
month,
day,
and
year to the constructor to create an object that
represents a certain date.
Note: You may have noticed in the above paragraphs that the references
to the
DateTime class are in a blue monospace font. In
all of the Curl language documentation, these blue monospace
references are links into the API Reference Manual. So, you can
just click these references in the documentation to go to the
API Reference Manual entry for the class, procedure, or other
language element that is being referenced.
To show your users the number of days between now and the end of
the year, you need to create a DateTime object that
represents the year's end. Do this by typing the following into
your applet's source code:
{let year-end:DateTime = {DateTime month=12, day=31}}
This is similar to the previous line of code, except that two
parameters are passed to the call to
DateTime's
constructor. These optional parameters take the form of
name=value and are comma separated. These
parameters tell the constructor to make a
DateTime object
that represents December 31st. Since no year is passed to the
constructor, it uses the current year, so the
DateTime
object represents December 31st (the 31st day of the twelfth
month).
Now that you have two objects that represent dates, you need to
determine the period of time that separates the two. In case of
DateTime objects, you can simply subtract one from the
other. The result of this subtraction is a value called a
quantity (in this case, a quantity of
Time). The Curl language, unlike most other languages, lets you
associate a unit of measure with a value. This means that your
applet knows that the result of subtracting two dates is a value
measured in seconds. To store this value, you need a variable of
the proper type:
{let seconds-left:Time = year-end - today}
This
let statement declares a variable to store values of
Time, and assigns it the results of subtracting today's
date from the date of December 31st.
Now that the time left before the end of the year has been
calculated, you can display it. To do that, you can use more text
formatting procedures.
Start out by creating a standard paragraph as a lead in to the
number of days. To make the number stand out, use a generic text
formatting procedure called text, and set its color option to make
the text it contains red.
{paragraph There are just
{text color="red",
To place the value of a variable into a text procedure, you use
the
value procedure which returns the value of the
variable. Since this value is going to be displayed, it is
automatically converted into a text format.
There is one last small problem, however. The value in
seconds-left is in seconds. That is, it tells you how many
seconds are left in the year. For most of your users, this isn't
going to be a very meaningful number. You can easily convert this
value into the number of days, since the Curl language has
a predefined quantity for days, and knows how this relates to a
quantity of seconds. Just divide seconds-left by the quantity
1day, and the result is the number of days.
So, add the following to your applet:
{value seconds-left / 1day}
All that is left is to close out the text and paragraph
expressions:
}
days left this year!
}
So, the entire section should look like this:
{let today:DateTime = {DateTime}}
{let year-end:DateTime = {DateTime month=12, day=31}}
{let seconds-left:Time = year-end - today}
{paragraph There are just
    {text color="red",
        {value seconds-left / 1day}
    }
    days left this year!
}
You can now save your file and run your applet.
The code in your applet currently is simple, so it is
unlikely that you have encountered an error. Eventually, however,
you will make a mistake, and the IDE will let you know about it.
There are two types of errors:
- Syntax errors are mistakes in the Curl language code
of your applet. These errors can include simple typos, passing
the wrong parameters to a procedure, or other basic
problems. Syntax errors are caught by the IDE as it is
preparing your applet to be run. When it finds a syntax error,
it stops the compilation process and tell you the error it
has found.
- Runtime errors occur while your applet is running. These errors
occur when something unforeseen happens that your applet
cannot handle. For example, trying to access an object that
does not exist generates a runtime error called
dereferenced
null pointer.
These two types of errors are handled differently in the IDE,
since you need to take different steps to fix them.
When the runtime starts running one of your applets, it starts
interpreting the applet's source code. If it encounters an error
in the source code, it stops running the applet and displays an
error message in the browser window, and in the IDE Errors
pane.
To see how errors are reported for yourself, type in the following
non-existent class name on a blank line in your applet's source:
{Prometheus}
then save and run the file. The browser window comes to the
foreground, and the applet starts to run.When the runtime
encounters the non-existent class name it displays an error
message in red text in the browser window, brings the IDE to the
foreground, and displays errors in the IDE Errors pane.
The entries in the Errors pane show you the file that contains the syntax
error as well as the line on which it occurs. You can quickly jump
to the location of the error in the Source Editor by
double-clicking the error's entry in the errors list. The
line of source code containing the error is highlighted.
To fix the error in your applet, simply delete the line you added
earlier.
After fixing a syntax error, you can save the file and try running
the applet again. The compiler may find more syntax errors, since
it stops compiling when it finds the first one in most cases.
Runtime errors occur while your applet is running, if your applet
tries to do something that it is not allowed to do, or cannot
complete for some reason. For example, running out of memory, and
attempting to access an object which does not exist all result in
runtime errors.
Normally, a runtime error just generates an error message in the
browser. However, if your applet is debuggable, a runtime error
brings the IDE to the foreground in debug mode. For more
information on making applets debuggable and using the debugger,
see
Debugging Your Applets.
This tutorial has introduced you to both the IDE and the Curl
language. You should next learn a bit more about the IDE,
by reading at least the following sections:
Copyright © 1998-2019 SCSK Corporation.
All rights reserved.
Curl, the Curl logo, Surge, and the Surge logo are trademarks of SCSK Corporation.
that are registered in the United States. Surge
Lab, the Surge Lab logo, and the Surge Lab Visual Layout Editor (VLE)
logo are trademarks of SCSK Corporation.