Your Curl applets are usually part of a Web site. Often, you will
want your applet to interact with other portions of your Web
site. These interactions can include:
- Retrieving files from the site
- Sending requests to the site via forms
- Accessing and manipulating browser cookies set by the site
This chapter explains how to let your applets interact with
Web sites.
Note: Many of the examples in this chapter need to be viewed on a Web
site in order to work properly. In these cases, a link after the
example code will lead you to the Curl Web site, where you can run
a live version of the example. The interactive examples in this
chapter require an Internet connection, since they need to contact
a Web site in order to run.
| Summary: | - Reading files from Web sites is just like reading from
local file system.
- Use http: and https: scheme URLs to read files
from Web servers.
|
The Curl®
Run Time Environment (RTE) supports reading remote files from a
Web server the same way you read files from disk or any other
resource. The only difference between reading a local file and
reading a file from a Web server is the URL used to access
the file.
URLs that use the
http: scheme are retrieved from Web
servers via the Hypertext Transfer Protocol (HTTP). URLs that use
the
https: scheme are retrieved from a Web server using
secure HTTP, which uses a Secure Socket Layer (
SSL) network
connection to encrypt and secure the data. See the
Accessing Files and Other Resources
chapter for more information.
The following code loads the HTML source of the Curl home page and
displays it in a TextFlowBox.
{value
   let web-buffer:TextFlowBox =
       {TextFlowBox width = 5in, border-width = 1pt,
           border-color = "black", margin = 2pt
       }
   let connect-button:CommandButton =
       {CommandButton
           label = "Get the Curl home page!",
           {on Action do
               {web-buffer.clear}
               let weburl:Url = {abs-url "http://www.curl.com"}
               let webdata:#TextInputStream
               {try
                   || Add the results to the TextFlowBox
                   set webdata = {read-open weburl}
                   || Keep getting stuff until there's no more
                   {until webdata.end-of-stream? do
                       {web-buffer.add {webdata.read-one-line}}
                       {web-buffer.add {br}}
                   }

                catch http-ex:HttpException do
                   {web-buffer.add
                       {text
                           color="red", Some sort of error
                           occurred connecting to {value weburl}:
                           {italic {value http-ex.value}}
                       }
                   }

                finally
                   {if-non-null webdata then
                       {webdata.close}
                   }
               }
           }
       }
   {spaced-vbox
       connect-button,
       {text Results:},
       web-buffer
   }
}
You can see the previous example running on the Curl Web site. Go
to
the
Demo Page and select
Accessing Files via HTTP.
The methods of the
HttpFile class provide Curl®
applets with control over HTTP, including the ability to set the
request method and request headers, send request data, and access
the response headers. The following example is a variation on the
previous example. Instead of displaying the contents of the URL,
this example displays the response headers.
The
read-open of an HTTP URL returns an instance of
HttpTextInputStream. The response headers are available
through the
response-headers
accessor. Similarly, the
read-open-byte of an HTTP URL
returns an instance of
HttpByteInputStream.
HttpByteInputStream also has a
response-headers accessor.
The following code demonstrates accessing the response headers.
{value
    let web-buffer:TextFlowBox =
        {TextFlowBox width = 5in, border-width = 1pt,
            border-color = "black", margin = 2pt
        }
    let connect-button:CommandButton =
        {CommandButton
            label = "Get the Curl home page!",
            || when button is clicked ...
            {on Action do
                let web-url:Url = {abs-url "http://www.curl.com"}
                let http-file:HttpFile =
                    {web-url.instantiate-File} asa HttpFile
                || open the Url
                let web-stream:HttpTextInputStream =
                    {http-file.http-read-open
                        || don't redirect
                        auto-redirect? = false,
                        || return response headers even if error status
                        always-return-response-headers? = true}
                || display status
                {web-buffer.add
                    "Status: " &
                    web-stream.response-headers.status}
                || display response headers
                {for value:String key name:String in
                    web-stream.response-headers do
                    {web-buffer.add {br}}
                    {web-buffer.add
                        name &
                        {if value == "" then
                            ""
                         else
                            ": " & value}
                    }
                }
                {web-stream.close}
                web-buffer
            }
        }
    {spaced-vbox
        connect-button,
        {HBox {text Response Headers:}},
        {HBox width=5in, web-buffer}
    }
}
You can see the previous example running on the Curl Web site. Go
to
the
Demo Page and select
Accessing Response Header.
Unprivileged applets have a limited ability to read files. See the
Security chapter for
details.
| Summary: | - The HttpForm class lets you create Web forms.
- Controls in an HttpForm that have a name
option set on them will be part of the request sent to
the Web site.
- Call the HttpForm.submit method to submit the
form to the site.
- Call HttpForm.reset to reset the controls on
the form to their original state.
- Data validation should be done by having each control
catch the Submit event and validating its own
contents.
- Use HttpForm.submit-open to have your applet read
the Web site's response itself.
- To directly query a Web site, your applet can create its own
HttpFormData object and send the request to the Web site.
|
One common form of Web site interaction is to provide a form that
users can fill out with information. Once users are finished
filling out the form, the browser sends the contents of the form
(called a request) to the Web site. The site takes the
information on the form, processes it, and responds with a new
document, such as search results, an order confirmation, or
whatever else is appropriate depending on the nature of the
request. The browser then displays the results, usually replacing
the form.
You can create Web forms using the Curl®
language by using the
HttpForm class, which is a subclass
of
Dialog. Creating a form using
HttpForm is
basically the same as creating one with the
Dialog class,
with a few enhancements specifically for Web forms. See the
Using Dialogs to
learn how to use dialogs. The rest of this chapter assumes you are
familiar with using dialogs.
Requests are transmitted by the browser to the Web site using one
of two methods: get or post. When making a
request using the get method, the data for the request is encoded
into the URL that is used to make this request. The server-side
script extracts and decodes the data from the URL. Since there
is less overhead involved with this method, get is often used
for simple requests involving forms with only a few fields. The
get method cannot handle large amounts of data or binary data,
since the data needs to be encoded into a URL, which can have
size limitations.
The post method encodes the form's data into the body of the
request. Post requests can handle larger amounts of data,
including binary files. Compared to get, this method is more
complex to decode, and results in larger amounts of data being
sent to and from the Web server in response to a request.
For security reasons, applets are limited in the connections they
can make to Web sites. The Curl RTE only allows applets to
contact Web sites that have granted permission for applets to
access their contents. Web sites grant this permission using by a
curl-access.txt file that states which applets are allowed
to contact it.
Any Web site to which your applet is going to submit a request
must have a
curl-access.txt that grants the applet access.
For an explanation of the
curl-access.txt file, see
Letting
Applets Access Web Sites.
The
HttpForm class acts as a container for controls that
will be part of the web form. When instantiating an
HttpForm object, you provide the URL of the CGI program on the
Web site that will receive the request:
Only the
action parameter (which is the URL of the CGI
script) is required. The optional parameters you can pass to the
HttpForm constructor are:
| Parameter Name | Values Accepted | Usage |
|---|
| method | HttpRequestMethod.get or
HttpRequestMethod.post | This specifies the request method that the form will use to
submit the values of its controls. get sends the
values as a part of the URL. post sends the values in
the HTTP header of the request. |
| encoding | Either HttpFormData.urlencoded-mime-type or
HttpFormData.multipart-mime-type | Controls how the data on the will be encoded. Some characters
are not allowed as data within a request, and so must be
encoded in a way that can be transmitted. The encoding usually
depends on the request method. All get requests must
use
urlencoded-mime-type. The post requests usually use
multipart-mime-type, since it has fewer limitations. If the
post request includes a file, it must use multipart-mime-type since
url-encoding cannot handle binary data. Whichever method you choose
must be accepted by your server-side script. |
| target |
| _self |
| _blank |
| _parent |
| _top |
| Controls where the results of the request will be displayed:

|
| default-character-encoding | A CharEncoding | The encoding method to be used for the text in the form. You
can leave this as the default CharEncoding.ascii
unless you expect the information entered onto the form will
use an extended character set, which may be the case for
languages other than English. Whichever encoding you choose
has to be accepted by the server-side script that will handle
the request. |
Within the
HttpForm object, you place the controls such
as
TextFields and
DropdownLists (see
Form Values below for a complete list
of controls) that you want the user to fill out with information
for the request. All of the controls that have a
name
local option set will have their contents transmitted to the Web
site as a part of the request. The
name attribute is used
as the name of the parameter that is sent to the CGI script. The
value for each control being submitted as part of the request is
taken from the control's
form-value accessor. For most
controls, this is essentially the same as the control's
value accessor. See
Form Values
for details on how a control's value is determined.
Note: Only controls that have a
name local option set at the
time they are added to the
HttpForm will be part of the
request. Setting the
name option on the control after it is
added to the form will not have an effect.
The form is submitted to the Web site when you call the form's
HttpForm.submit method.
The following code shows a very simple Web form that consists
of a single field.
{HttpForm
    {url "http://www.curl.com/cgi-bin/list-parameters.pl"},
    target="_blank",
    {spaced-hbox
        {text Your name:},
        {TextField name="name"},
        {reset-button},
        {submit-button}
    }
}
The form created by the above code looks like this.
You can see the previous example running on the Curl Web site. Go
to
the
Demo Page and select
A Simple Form.
In the above example, the CGI script will receive a single form
parameter called
name which has the value that the user
entered into the
TextField.
The
reset-button procedure returns a
CommandButton that calls the
HttpForm.reset method of
the form that contains it. The
reset method forces all of
the controls in the form to revert to their default values. This
has the same effect as the reset buttons on HTML-based
forms. Similarly, the
submit-button procedure creates a
CommandButton that calls the
HttpForm.submit
method of the form that contains it. These buttons are sufficient
for simple Web forms where the data the user entered does not have
to be checked before being submitted to the Web site.
As mentioned earlier, all of the controls within an
HttpForm which have a
name attribute will have their
values sent to the Web site when the form is submitted. The value
sent to the Web site is not the control's
value
accessor. Instead, the control's
form-value is used.
The following table explains how this value is derived for the
different types of controls that can appear within an
HttpForm.
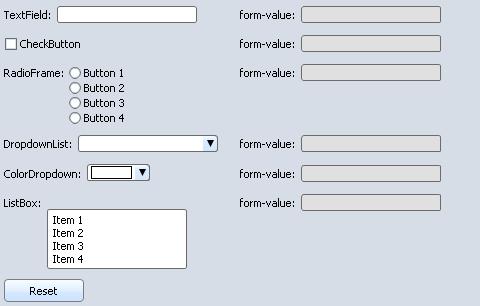
| Control Type | form-value is: |
|---|
| TextField | control-name.value |
| PasswordField | control-name.value |
| TextDisplay | control-name.value |
| CheckButton |
| If checked, control-name.check-value |
| If not checked, null |
|
| RadioFrame | {form-string control-name.value} |
| RadioButton | null, the RadioFrame provides the value that
is submitted by the form. |
| DropdownList | {form-string control-name.value} |
| ColorDropdown | {form-string control-name.value} |
| ListBox |
| If nothing is selected, null |
| If one item is selected,
{form-string control-name.value} |
| If more than one item is selected, each value is
converted to a String using
form-string. All the values are submitted as a
StringArray. |
|
The following example demonstrates the values returned by various control's
form-value accessor.
| Example:
Values Returned by form-value |
 |
{let text-field-display:TextDisplay = {TextDisplay}}
{let check-button-display:TextDisplay = {TextDisplay}}
{let radio-frame-display:TextDisplay = {TextDisplay}}
{let dropdownlist-display:TextDisplay = {TextDisplay}}
{let listbox-display:TextDisplay = {TextDisplay}}
{let colordropdown-display:TextDisplay = {TextDisplay}}

{HttpForm
    {url "http://www.curl.com/"},
    {table
        width=5in,
        {row
            {cell TextField:
                {TextField
                    name="name",
                    {on ValueChanged at t:TextField do
                        || Set the display that appears next
                        || to the control to the value that would
                        || be sent. This has no impact on what would
                        || be sent to the server if the form were
                        || submitted.
                        set text-field-display.value =
                            {if-non-null t.form-value then
                                t.form-value
                             else
                                "null"
                            }
                    }
                }
            }
            {cell form-value: {value text-field-display}}
        }
        {row
            {cell
                {CheckButton
                    label="CheckButton",
                    name="check-button",
                    check-value="Button Checked",
                    {on ValueChanged at c:CheckButton do
                        set check-button-display.value =
                            {if-non-null c.form-value then
                                c.form-value
                             else
                                "null"
                            }
                    }
                }
            }
            {cell form-value: {value check-button-display}}
        }
        {row
            {cell RadioFrame:
                {RadioFrame name = "radio-button",
                    {VBox
                        {RadioButton radio-value = "Button 1"},
                        {RadioButton radio-value = "Button 2"},
                        {RadioButton radio-value = "Button 3"},
                        {RadioButton radio-value = "Button 4"}
                    },
                    {on ValueChanged at r:RadioFrame do
                        set radio-frame-display.value =
                            {if-non-null r.form-value then
                                r.form-value
                             else
                                "null"
                            }
                    }
                }
            }
            {cell form-value: {value radio-frame-display}}
        }
        {row
            {cell DropdownList:
                {DropdownList
                    name="drop-down-list",
                    {ListValueItem value="bold", {bold bold}},
                    {ListValueItem value="italic", {italic italic}},
                    {ListValueItem value="underline", {underline underline}},
                    {on ValueChanged at d:DropdownList do
                        set dropdownlist-display.value =
                            {if-non-null d.form-value then
                                d.form-value
                             else
                                "null"
                            }
                    }
                }
            }
            {cell form-value: {value dropdownlist-display}}
        }
        {row
            {cell ColorDropdown:
                {ColorDropdown
                    name="color-drop-down",
                    {on ValueChanged at cd:ColorDropdown do
                        set colordropdown-display.value =
                            {if-non-null cd.form-value then
                                cd.form-value
                         else
                                "null"
                            }
                    }
                }
            }
            {cell form-value: {value colordropdown-display}}
        }
        {row
            {cell ListBox:
                {ListBox
                    height=48pt,
                    name="listbox",
                    "Item 1", "Item 2", "Item 3", "Item 4",
                    {on ValueChanged at l:ListBox do
                        set listbox-display.value =
                            {if-non-null l.form-value then
                                let buf:StringBuf = {StringBuf}
                                || Get the strings from the array
                                {for s:String in l.form-value do
                                    {buf.concat s & " "}
                                }
                                {buf.to-String}
                             else
                                "null"
                            }

                    }
                }
            }
            {cell form-value: {value listbox-display}}
        }

        {row
            {cell {reset-button}}
        }
    }
}
| |
One of the strengths of using the Curl language to create
Web forms is the ease with which you can check the form's data
before sending it to the server. Performing as much validation
as possible on the client's side can cut down on instances of the CGI
script sending back a response asking the user for missing or
corrected information.
The easiest way to validate form data is have each field whose
content needs to be validated before submission catch the
Commit event. This event is fired at every control in the
HttpForm when the form is submitted. If the control's content is
missing or incorrect, it can throw an exception to prevent the form
from being submitted to the Web site.
In order to catch any exceptions thrown by the controls on the
form, you will need to create your own submit button rather than
relying on the
submit-button procedure to create one for
you. Fortunately, this is easy; just wrap a
try block
around the call to the form's
HttpForm.submit method
within the
Action event of a
CommandButton (see
below for an example).
All of the controls in a Web form can access the
HttpForm
object that contains them by using their own
form
accessor. Reading this accessor on a control that is not within an
HttpForm causes an error. This is very useful when
creating your own submit button, since you do not have to tie the
button to a specific Web form.
The following code demonstrates having a control on a form that
will validate its contents before allowing the form to be
submitted. The example defines a custom exception class to
differentiate the exception thrown by the fields from others that
could be thrown.
|| Define an exception that the fields can throw.
{define-class public HttpFieldException {inherits Exception}
  {constructor public {default message:String}
    {construct-super message}
  }
}

{HttpForm
    {url "http://www.curl.com/cgi-bin/list-parameters.pl"},
    {spaced-vbox
        halign="right",
        {spaced-hbox
            {text Name:},
            {TextField
                name="name",
                || When user submits the form, check to ensure
                || field has content.
                {on Commit at f:TextField do
                    {if f.value.empty? then
                        {throw
                            {HttpFieldException
                                "Name field must have a value."
                            }
                        }
                    }
                }
            }
        },
        {HBox
            {reset-button},
            {Fill},
            {CommandButton
                label="Submit",
                {on Action at s:CommandButton do
                    {try
                        {s.form.submit}
                     catch e:HttpFieldException do
                        {popup-message
                            {text There is a problem with
                                the form: {value e}.
                            }
                        }
                     catch e:HttpException do
                        {popup-message
                            {text An error occurred while submitting
                                the form: {value e}
                            }
                        }
                    }
                }
            }
        }
    }
}
You can see the previous example running on the Curl Web site. Go
to
the
Demo Page and select
A Data-validating Form.
This approach to validating the form's content is flexible, since
each control is responsible for its own validation. Adding a new
control to the field does not require any changes to the
submit button's code.
You can use the
form accessor of the controls in the
HttpForm object to create a form that is submitted when
the user enters a value into a control. For example, you can
create a search form that is submitted when the user types in a
search term and presses
enter. All you need to do is
have the control submit the form when it receives an
Action,
ValueFinished, or other event.
The following code shows how you could create a search field in
an applet that is submitted when the user presses enter.
{HttpForm
    {url "http://www.curl.com/cgi-bin/list-parameters.pl"},
    margin=4pt,
    {spaced-hbox
        {text Search:},
        {TextField
            name="search-term",
            {on Action at t:TextField do
                {t.form.submit}
            }
        }
    }
}
You can see the previous example running on the Curl Web site. Go
to
the
Demo Page and select
A Form Without a Submit Button.
In addition to the values of the controls they contain,
HttpForm objects can also submit the content of files in a
request to a Web site. This ability lets you create applets
that upload photos, resumes, and other files from the client
system to the Web site.
You add files to the data the
HttpForm is going to submit
to the site by calling its
add-file method, passing it a parameter name and the URL of the
file. The file's name is automatically sent along with the file
data. You can also submit an array of bytes as a file by calling
the
add-file-data method,
which takes the name of the parameter, the file's name, and the
{Array-of byte} that contains the file's
data. This method is useful if your applet has read a file into
memory already (applied a filter to an image, for example).
Unprivileged applets can only access a local file if given
permission to do so by the user. This means that your applet will
usually call
choose-file,
choose-multiple-files,
or
choose-location in order to get permission to access a
file to upload. For details regarding applet security, see the
Security chapter. See
Creating File
Dialogs for an explanation of using the standard file dialogs.
You must use a post submission method and have the form's contents
encoded with multi-part encoding to submit a file as part of a
form, since the file's data cannot be encoded within a URL.
The following code demonstrates creating a form that submits a
request containing a single user-specified file. The user selects
a file to submit by clicking the
Choose File button, which
calls
choose-file and stores the result in the
file-url variable. The selected file is added to the form when
the user presses the
Submit button by calling the form's
add-file method.
|| Holds the URL of the file the user wants to upload
{let my-file-url:#Url}
{let submit-button:CommandButton =
    {CommandButton
        enabled?=false,
        label="Submit",
        {on Action do
            || Add the file to the form
            {submit-button.form.add-file
                "uploaded-file",
                || will not be null when Submit button is enabled
                {non-null my-file-url}
            }
            || Submit the request
            {submit-button.form.submit}
            set submit-button.enabled? = false
            set submit-button.label = "Submit"
            {submit-button.form.reset}
        }
    }
}

{HttpForm
    {url "http://www.curl.com/cgi-bin/file-upload.pl"},
    margin=6pt,
    method=HttpRequestMethod.post,
    encoding=HttpFormData.multipart-mime-type,
    {spaced-hbox
        {CommandButton
            border-style=BorderStyle.raised,
            label="Choose File",
            || Ask the user for a file.
            {on Action do
                set my-file-url =
                    {choose-file title="Select a file to upload"}
                {if-non-null my-file-url then
                    || Display the name of the selected file
                    set submit-button.label = "Submit " & my-file-url.name
                    set submit-button.enabled? = true
                }
            }
        },
        submit-button
    }
}
You can see the previous example running on the Curl Web site. Go
to
the
Demo Page and select
A Form That Uploads Files.
In the previous Web form examples, the Web site's response to the
request is sent back to the browser, where it replaces the existing
content (the Curl applet containing the form). This response is
usually an HTML page, but could also be a dynamically-generated
Curl applet, an image, or any other file that the browser knows
how to handle. This request and response cycle is basically the same as
using HTML forms.
For more sophisticated applications, you can have your Curl applet
submit a request, then have it read back the results itself. The
applet can then handle displaying the results however it wants.
Using this method can provide a smoother user-experience since
only the content that needs to change is updated.
To read the results of a request, your applet should call
HttpForm.submit-open rather than
submit in order to
submit the request to the Web site. If you expect the results from
the server to be binary data rather than text (such as an
image), your applet should use
HttpForm.submit-open-byte. These methods return an input stream
(
HttpTextInputStream or
HttpByteInputStream)
from which the applet can read the results the Web server sent
back.
The following example demonstrates submitting a request to a
script and reading back the results. In this case, the
response from the Web site is HTML code, which is
shown in a
TextFlowBox.
| Example:
Reading the Results of a Request |
 |
{let results:TextFlowBox = {TextFlowBox}}

{HttpForm
    {url "http://www.curl.com/cgi-bin/list-parameters.pl"},
    {spaced-hbox
        {text Search:},
        {TextField
            name="search-term",
            {on Action at t:TextField do
                || Clear out the results
                {results.clear}
                || Send request and read results
            let reply:#HttpTextInputStream
                {try
                    set reply = {t.form.submit-open}
                    {results.add {reply.read-one-string}}

                 catch e:Exception do
                    {results.add
                        {text An error occurred while contacting the
                            server. The error was {italic {value e.value}}
                        }
                    }
                }
            }
        }
    }
}
{value results}
| |
|| Create a single String parameter for the request
{let request-param:HttpFormStringParam =
    {HttpFormStringParam
        "search-query", "curl"
    }
}

|| Create the form data and add the parameter to it.
{let my-request:HttpFormData =
    {HttpFormData}
}

{my-request.append request-param}

|| Call browse-url-form when user clicks a button

{CommandButton
    label="Click me!",
    {on Action do
        {{get-the-applet}.browse-url-post
            || This is the URL we are sending the request to (usually
            || some sort of CGI script)
            {url "http://www.curl.com/cgi-bin/list-parameters.pl"},
            my-request
        }
    }
}
You can see the previous example running on the Curl Web site. Go
to
the
Demo Page and select
Directly Querying Web Sites.
You can create a query string from the contents of a
HttpFormData object for inclusion in a URL by calling the
object's
request-data-urlencoded-string method. The query string returned
by this method can be added to a
Url by calling
Url.set-query. You can then use
read-open to open a stream
from a CGI script that can handle URL-encoded requests.
Web sites often have browsers store small pieces of information,
called cookies on the client system. Cookies are
defined in the header of an HTTP request. They are used to
maintain state, such as session identification or user names, in
between requests. For HTML-based Web applications, this is a common
way to preserve state between requests to the Web
server. The cookie lets the server associate a request from a
client with an ongoing session.
Curl applets do not rely on cookies help to maintain state
information. Normally, the browser will load an applet from a site
initially, and the applet will continue running until the user is
through using it. Applets can use
Persistent Data to store small amounts
of data between sessions, so that the applet can remember settings
from the last time the user last ran it.
However, sometimes it is useful for applets to have access to the
cookies that other pages may have set up, or to create cookies
that other pages can access. Access to cookies can help you create
a seamless transition from an HTML-based server-side application
to a Curl-based one, or vice versa. You may also want your applets to
take advantage of existing data stored in cookies.
Since they are part of the HTTP request's header, cookies can be
sent from the browser to the Web site for a request for any sort
of file from the Web site, not just an HTML document. Cookies are
sent when the browser requests images, data files, or Curl applets,
or makes any other request for which the cookie is valid.
Users can set their browsers to refuse to accept certain cookies,
or all cookies. If your Web application requires the browser to
accept cookies in order to work, you need to tell your users about
this requirement.
Your applets can access the cookies the browser would send when
requesting a specific URL by using the
get-http-cookies
procedure. Unprivileged applets can only request the list of
cookies the browser would send as a part of the request for the
applet's own URL, or the URL for a file in the same directory as
the applet. See the
Security chapter for more about security precautions.
The call to
get-http-cookies returns an
Array-of
HttpCookie that represents all of the cookies the browser
would send to the Web site when requesting the URL. Each
HttpCookie in the array returned by
get-http-cookies
contains fields for a cookie's name, value, expiration date, and
other information. All of these fields may not be available for
every cookie. However, each cookie's name and value are
guaranteed to be within the
HttpCookie object.
The following code demonstrates accessing the cookies the browser
would pass to the Web site for the applet's own URL.
|| Get the cookies for this applet's URL.
{let cookies:{Array-of HttpCookie} =
    {get-http-cookies
        {get-the-applet}.url
    }
}

|| Table to list cookies in
{let cookie-list:Visual =
    {Table
        {row-prototype
            font-weight="bold",
            "Name",
            "Value",
            "Expiration"
        }
    }
}

{if cookies.empty? then
    || There were no cookies
    {set cookie-list = {text No cookie for you!}}
 else
    {for cookie:HttpCookie in cookies do
        {cookie-list.add
            {row-prototype
                cookie.name,
                cookie.value,
                || Expires and other fields may return null,
                || If expires means null, then this is a cookie
                || that only lasts until the current session
                || ends (i.e. user closes the browser).
                {if-non-null cookie.expires then
                    cookie.expires
                 else
                    {text Session-only}
                }
            }
        }
    }
}

{value cookie-list}
You can see the previous example running on the Curl Web site. Go
to
the
Demo Page and select
Getting Cookies.
Both cookie-setting procedures take a
Url and an
HttpCookie. The
Url is the URL for which the cookie is
valid. The browser will send the cookie back to the Web site for
any request with the URL, or for any request in a child directory
of the directory named in the URL. A URL that just specifies the
Web site's root (i.e.
http://www.example.com/) will create
a cookie that the browser returns to the Web site for all requests
on the site.
Similar to the restriction on retrieving cookies, an unprivileged
applet cannot set a cookie for a URL that is not for the directory
that contains the applet.
{let cookie-name:TextField = {TextField}}
{let cookie-value:TextField = {TextField}}

{let change-it:CommandButton =
    {CommandButton
        label="Set cookie",
        {on Action do
            {if not (cookie-name.value.empty? or cookie-value.value.empty?)
             then
                || Construct the cookie
                let cookie:HttpCookie =
                    {HttpCookie
                        cookie-name.value,
                        cookie-value.value
                    }
                || Set the cookie so that the browser will
                || submit it to the server for any requests
                || under the applet's directory.
                {set-insecure-http-cookie
                    {get-the-applet}.url,
                    cookie
                }
                || Now load the applet that displays the
                || cookies.
                {{get-the-applet}.browse-url
                    {url "get-cookies.curl"}
                }
             else
                {popup-message
                    {text You must provide both a cookie name
                        and a value.}
                }
            }
        }
    }
}

|| Lay out the controls.
{VBox
    halign="right",
    {spaced-hbox {text Cookie name:}, cookie-name},
    {spaced-hbox {text Cookie value:}, cookie-value},
    {spaced-hbox {Fill},change-it}
}
You can see the previous example running on the Curl Web site. Go
to
the
Demo Page and select
Setting Cookies.
By default, all HTTP related calls that an applet makes execute in
the applet's process. Under these circumstances, a Curl applet has
limited ability to share information such as cookies and login
state with the browser. The applet can share cookies only with
Internet Explorer, and not with other browsers. Curl applets can
share cookies with Internet Explorer only when the cookies have an
expiration date in the future. These cookies are written to disk,
allowing the applet to share them.
HTTP cookie sharing between the Curl RTE and IE7 does not work on
Vista as it did on previous Windows operating systems. In order to
share cookies, the user must use the
Security tab on the
Curl Control Panel to add the web site host to the list of
privileged hosts. See this
Microsoft support
article for a more detailed discussion of the issue.
An applet running in a browser other than Internet Explorer can
get only the cookies the Web site sent in the header of any HTTP
transaction that the applet performed, such as importing packages,
including file and images.
If your Web application requires Curl applets to share state with
HTML-based pages and must support non-Internet Explorer browsers,
you can have the Web site encode data in the URL used to download
the applet, or dynamically generate Curl applets which contains
the shared data.
Another option is to use the procedure
request-browser-resident-http to request that HTTP-related calls
execute in the browser process. In browsers that support browser
resident HTTP, all HTTP cookie calls, HTTP authentication calls,
and opening of "http:" and "https:" calls use the same cookies and
authentication information as the web browser. Browser resident
HTTP is fully supported for the Curl RTE only on Internet
Explorer. It is supported to a limited extent on other browsers.
{request-browser-resident-http}
This call requests full browser resident HTTP, available only
under Internet Explorer on Windows platforms.
- If these conditions are met, then:
- If these conditions are not met, then:
If your applet can function with less than full support for
browser resident HTTP, call
request-browser-resident-http with an argument specifying minimal
level support:
{request-browser-resident-http BrowserResidentHttpStyle.minimal}
This call requests minimal browser resident HTTP. The applet gets
whatever support is available under the current browser.
- If the applet is running under Internet Explorer, then:
- If the applet is running under some other browser, so full support
is not available, then:
- If no support is available, then:
Minimal support for browser resident HTTP provides significantly
less functionality than full support. The exact level of support
differs from one browser to another. This section lists some
of these limitations.
The following procedures that get and set HTTP cookies do not
work.
get-http-cookies returns an empty array; the others
fail silently.
The following procedures that perform API based HTTP
authentication fail silently. Under full browser resident HTTP,
these calls set the username and password. Because these calls do
not work under minimal support, any requests that require a
username and password cause a dialog box to pop up asking for that
information.
The following procedures and methods that get response headers,
response status codes, and specialized failure exceptions based on
status codes for cases like missing file or permission denied will only work sometimes and only on some newer
web browsers. The only headers that always might be present in the
response are the Last-Modified, Content-Length, and Content-Type headers. Content-Type may be missing any charset parameter. Newer web browsers
may have full headers for successful requests. For older web browsers,
the only status codes are 200 or 404, and 404 will sometimes be used for
failures that should have other status codes even on new web browsers.
For older web browsers, setting the CharEncoding for text
streams based on the HTTP headers also does not happen.
Some problems exist with exceptions thrown by the following
methods. When an HTTP request fails, it throws an exception. With
minimal browser resident HTTP, the exception thrown does not
always reflect the actual reason for failure. You may get an
HttpException or an
HttpMissingFileException
when you should have gotten a different type of http
exception. You never get an
HttpPermissionDeniedFileException. You do not get an exception
when the request works, although with some browsers, such as
Netscape 4.x, you sometimes get what looks like success, but is
really the error page from the web server when you should have
gotten an exception.
Setting the
FileCachingStyle for HEAD or GET with
with-file-caching-style does not work. This means that most of
the package and manifest resynchronization behaviors do not work
as well as normally.
Browsing away from an applet cancels active HTTP requests, and
may throw exceptions.
A number of limitations apply to the following methods:
These limitations are:
- HEAD requests are simulated by doing a GET followed by a quick
cancel.
- Setting the request-headers parameter for GET or HEAD
requests does not work. Setting always-return-response-headers? to true does nothing.
- Controlling redirection by setting the auto-redirect?
parameter to false does not work.
- For FireFox revisions lower than 1.5 and Mozilla revisions
lower than 1.7 off-line mode is not reported correctly.
- For older versions of FireFox, Mozilla and for Netscape
revisions 6.0 and higher:
- Opening a URL with a host name that can not be looked up hangs.
- Opening a URL not in the cache when in off-line mode hangs
- Netscape 4.6 and 4.7:
- Opening URLs for files that do not exist just return
the error page contents from the web server, but do
not throw an exception.
- In off-line mode no HTTP requests work.
- For Opera, various versions have various issues, including
hanging if the applet tries to read its own source code,
off-line mode making all HTTP requests fail, and hanging after
requesting too many non-existent files.
When you deploy an applet that uses the minimal style of browser
resident HTTP, you must take some additional steps to deal with
the limitation that this implementation of HTTP cannot force
reloading of files. See
Caching and Synchronization for a general discussion of
synchronization issues.
You need to configure your web server to mark the initial applet
file as expired at a time such that users see updates to the
applet as soon as you want them to. You also need to either change
the name or directory of any files that change, or mark those
files as expired. For most files other than the initial applet
file or manifest, changing the path to the file is better than
marking the file as expired.
Expiring files sets a time limit on how long they may be cached
before resynchronization. Once a file has been cached on the
client, it is too late to set its expiration, so you need to
specify expiration times when you deploy your application. At that
time, you may not know whether you will change file contents,
or how often. Having many files expire quickly can result in extra
synchronization between the client and server, which can take
significant time, especially over a slow connection. If the only
file you expire rapidly is the applet itself, then the applet is
the only thing that absolutely has to be resynchronized when it is
reloaded. When Curl does the HTTP calls itself, it can enforce the
applet's resync-as-of attribute directly and no files need
to be renamed when they are deployed. Under browser resident HTTP,
Curl has no way to tell the browser to re-synchronize, so the
deployer must either rename any changed files to a new name, that
is one that could not have been previously cached on the client,
or must have previously arranged to expire all potentially
changing files, which could be slow.
The main manifest file should also either be moved, or be marked
as expired. If the main manifest file has a
resync-as-of
attribute, the
resync-as-of time needs to be updated
whenever anything used by the applet changes. If you are using a
resync-as-of attribute in the manifest, you might also
want to add a
cache-duration attribute that is set to a
low value to the meta-data. Such a
cache-duration
attribute tells the Curl RTE to re-check the main manifest file
frequently. See
Using cache-duration in Packages and Manifests for more information on
setting
cache-duration.
Another option is to put a resync-as-of attribute in the
applet file. A resync-as-of attribute in the applet file
needs to be updated whenever a package used by the applet changes,
but produces optimal synchronization behavior. A resync-as-of attribute in the applet overrides one in the main
manifest. IDE deployment automatically manages the resync-as-of attribute in the main manifest file, but not in the
applet.
You can use
delegate-to for manifests for your packages,
or for a library of packages which are used together. Using
delegated manifests makes updates where only some packages change
more efficient. Using
manifest-url to load support files
like images means that the applet or package does not need to
change if the support files move. In any case all manifest files
need to move or be marked as expiring quickly. Remember that if
the applet or main manifest has a
resync-as-of attribute,
it must be updated whenever anything else changes. Any
resync-as-of attributes in delegated manifests are ignored.
For example, if you have an applet with the following structure:
    appletX
        start.curl (marked as expiring quickly)
        manifest.mcurl (marked as expiring quickly)
    packageA
        manifest.mcurl (marked as expiring quickly)
        1.0
        load.pcurl
    packageB
        manifest.mcurl (marked as expiring quickly)
        1.1
        load.pcurl
        image.jpg
And you updated packageB, the following would change:
    appletX
        start.curl (marked as expiring quickly)
            resync-as-of, if used, would change
    manifest.mcurl (marked as expiring quickly)
            resync-as-of, if used, would change
    packageA
        manifest.mcurl (marked as expiring quickly)
        1.0
        load.pcurl
    packageB
        manifest.mcurl (marked as expiring quickly)
            path to load.pcurl and image.jpg changes.
        1.2
            new directory name for new version.
        load.pcurl
            only desired code and the version number changes.
        image.jpg
The method for specifying translation file described in
Specify
the Translation File does not work correctly with minimal browser
resident HTTP running under Netscape 4.7 because missing files are
not handled as expected. In this situation, you must specify the
translation file for a package should be specified in the manifest
for the package project. See
Using Manifests to
Locate Translation Files When deploying an applet that calls
occ-install-or-update
that also uses minimal style browser resident HTTP, the special
deployment steps must be done, and some extra steps must be done
for the applet to update properly. See
Occasionally Connected Computing (OCC) for a discussion
of applets designed for OCC.
For a root installer, the curl-timestamp.txt and
whichever of curl-contents.txt or curl-archive.car is being used, must all be marked as expiring
quickly. And if a curl-contents.txt file is being
used, the list of files in it changes if the files were moved as
needed for normal deployment.
For module installers, all of the curl-modules.txt
files need to be marked as expiring quickly. And as with a root
installer, all curl-timestamp.txt and curl-contents.txt or curl-archive.car files need to
be marked as expiring quickly.
To implement the recommended expirations with an Apache server,
you can add configuration lines similar to the following. These
lines go inside of an .htaccess file, or inside a
<Directory> section in the main configuration file.
You might need to modify the regular expression if you use
different names for your manifest or applet start files.
# matches curl-contents.txt, curl-modules.txt, curl-timestamp.txt,
# curl-archive.car, manifest.mcurl and start.curl
<FilesMatch "^(curl-(contents|modules|timestamp)\.txt|curl-archive\.car|manifest\.mcurl|start\.curl)$">
ExpiresActive On
# expire immediately
ExpiresDefault A0
</FilesMatch>
To implement the settings on IIS, set the properties on the
directory to have all content expire immediately.
Copyright © 1998-2019 SCSK Corporation.
All rights reserved.
Curl, the Curl logo, Surge, and the Surge logo are trademarks of SCSK Corporation.
that are registered in the United States. Surge
Lab, the Surge Lab logo, and the Surge Lab Visual Layout Editor (VLE)
logo are trademarks of SCSK Corporation.