| Summary: | The Curl® language's graphics and user interface
capabilities consist of the Curl® GUI Toolkit and
interfaces for creating your own graphic objects and scenes. The
GUI Toolkit, a collection of high-level building blocks to
facilitate creating applets written in the Curl language,
supports: - simple HTML-like text and images
- complex, highly customizable interactive layouts
|
The GUI Toolkit supports a range of functionality derived from
simple, predefined elements such as text formats, images, links,
buttons, drop-down lists, and text fields. These can be used to
create both simple HTML-like interactive Web pages and complex,
highly-customized Web applications.
The toolkit is of use to:
- Web document writers
- GUI designers
- Object-oriented applet developers
Because it is used to create high-level user interfaces, almost
any Curl Web application uses some aspects of the GUI Toolkit. Its
capabilities include:
- text manipulation and display
- basic graphical objects and their properties
- nested objects and layout
- windowing and event handling
- controls and dialogs
You can find information about formatting text at
Getting Started with Text
Formats, which provides a tutorial-like introduction to basic
text formatting, and
Text Formatting, which explains how to use
built-in text formats and how to write your own.
The GUI Toolkit consists of a set of packages that support a high-level
user interface to text and graphics. The superpackage
CURL.GUI.STANDARD includes all the GUI Toolkit packages.
CURL.GUI.STANDARD is imported automatically when the
Curl® runtime encounters the
{curl ... applet}
herald in your applet's source code. For more information about
Curl applets and heralds, see
Applets.
CURL.GUI.STANDARD also imports
the graphics superpackage,
CURL.GRAPHICS.STANDARD.
If you are using the {curl ... package} herald to create a
package rather than an applet, CURL.GUI.STANDARD is not
automatically loaded when your package is compiled. To include the
GUI Toolkit functionality in a package, use the import statement:
{import * from CURL.GUI.STANDARD}
Note: If you would rather import only the specific packages that
your applet requires, be aware that there are many dependencies
between the packages in CURL.GUI.STANDARD.
The Curl® GUI Toolkit consists of a complete set of
classes used for creating applications with a graphical user
interface. In this system, all objects that are created for
display are called
visual objects because they are
instances of
Visual subclasses. The
Visual
class represents objects that can be displayed.
Visual objects are of two different types, formatted text and all
other graphics. Formatted text includes all objects created from
text formatting expressions, such as character formats, paragraph
formats, and table text formats. For more information on how to
format text, see
Text
Formats. All other visual objects are instances of the
Graphic subclass and are therefore called
graphical
objects.
Here are the most important top-level classes from which
graphical objects can inherit properties:
When programming applets written in the Curl® language,
you typically create a user interface by building a
graphic hierarchy of graphical objects, that is,
by putting graphical objects inside of other graphical objects
that serve as containers, such as scroll boxes or tables,
which may in turn be displayed inside of
another graphical object, such as a window on your computer
screen.
When you add a non-graphical object
to a graphic hierarchy, the Curl® runtime automatically attempts to convert
it to a graphical object first. Strings of characters, as well
as formatted text, are converted automatically
to graphical objects whenever they are placed within a graphical
container. Because of this automatic conversion mechanism,
you can easily add text to any graphic hierarchy. Thus, in
many ways, you can use pieces of formatted and unformatted text
as if they were also graphical objects.
All graphical objects and elements have attributes that define their
appearances. These attributes are called options, which,
depending on the option, can be explicitly set or are set
automatically as you build the graphical user interface.
A graphic hierarchy describes a structure of nested graphical
objects, built to serve as a user interface.
For example, this phrase describes a graphic hierarchy:
text in a dialog box that also
contains an editable text field and two command buttons

The text, text field, buttons, and dialog box are all
graphical objects. If a button is placed in a dialog box, the
button is the graphical child of the dialog box, which is
its graphical parent.
In general, multiple graphic hierarchies exist at any given moment
during the execution of a Curl applet, but a given graphical
object can be a part of at most one graphic hierarchy at a time.
Each graphic hierarchy has a
RootFrame object at the root
of the hierarchy.
- If the graphic hierarchy is intended for display on a
screen, a View object is at its root.
- If the graphic hierarchy is to be sent to the printer,
a PrintRootFrame object is at its root.
When you add objects to a graphic hierarchy, the Curl runtime can
convert the objects, and can implictily add additional objects to
the hierarchy. These objects are not visible in the display, but
you can see them by viewing the graphic hierarchy in the
Inspector. See the IDE documentation for information on using the
Inspector.
In the Curl language, you can create a graphic hierarchy using two styles:
- Declaratively, without using variables to represent the graphical objects.
You create the hierarchy by
writing a Curl language expression whose structure mirrors the
hierarchy you intend to create. This is the simpler way,
commonly called the declarative style of programming,
to create nested graphical objects.
Objects instantiated in the fashion
cannot be used later to make method calls.
- With variables representing the graphical objects.
You declare a variable and set it
to an instantiated container object. Then, using method
calls (such as add) or the assignment expression
(set x = y), you can add
graphical children, set option values, and so on. This
technique requires writing more code, but provides
access to a greater range of tools for building the
graphic hierarchy.
The GUI Toolkit gives you the ability to combine these two styles
seamlessly. Examples showing
both programming methods are shown in the next section.
This section shows the two techniques of building a simple graphic
hierarchy consisting of a
VBox, a text element, a
TextField, an
HBox, and two
CommandButtons.
(To find out about
VBoxes,
HBoxes, and all the other types
of graphical containers, see the
chapter on
Graphical Containers.
To learn more about
CommandButtons, see the
section
Button Controls of the Developer's Guide.)
Using the declarative style to create nested graphical objects,
you can think of the
graphic hierarchy as being built in one big step. The graphic
hierarchy is built as follows:
- Create a VBox in which there are the following:
The structure of the Curl language expression mirrors that of the
graphic hierarchy, in which the
VBox
contains the text,
TextField, and
HBox, which in turn
contains the two
CommandButtons. The relative "containment"
of objects is defined by the relative positions of
the objects' curly braces. The syntax for such an expression
is shown in a sample graphic hierarchy as follows:
{ClassName1 option-bindings1,
    {ClassName2 option-bindings2},
    {ClassName3 option-bindings3}
}
where:
- each ClassName* is the name of a Curl language class.
- {ClassName1} creates an instance of the class
ClassName1.
- option-bindings* are option bindings that
are separated by commas. Each option binding consists of a
option=value construct, and all are used to
initialize the created object.
- a graphic hierarchy is constructed with the new ClassName1
object as graphical parent of two graphical children of types
ClassName2 and ClassName3.
- the graphical children are separated from one another by commas.
Notice that the code in the example shows the
setting of options, which determine the appearance of
the various graphical objects, such as the width, the height,
the color of their borders, and so on. They must be placed
after the class name, but can be
anywhere within the curly braces of their corresponding
object instance, including before, among, or after
the graphical children.
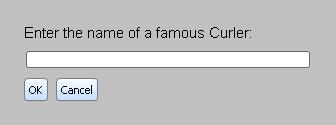
| Example:
Creating Graphic Hierarchies Declaratively |
 |
|| Here graphical objects are created directly within a
|| VBox container without assignment to variables
{VBox spacing=6pt,
    margin=0.25in,
    background="silver",

    ||text
    "Enter the name of a famous Curler:",

    ||TextField
    {TextField width=3in},

    ||HBox containing two CommandButtons
    {HBox spacing=6pt,
        {CommandButton label="OK"},
        {CommandButton label="Cancel"}
    }
}
| |
The same layout can be constructed with the use of variables to
represent graphical objects, as shown in the following example, which
also demonstrates use of the
Visual.add method (inherited
by all graphical objects) and the assignment expression:
set field-access-expression = option-value
Using this technique, the graphic hierarchy can be built as follows:
- Create a VBox and an HBox.
- Add two CommandButtons to the HBox.
- Add text to the VBox.
- Add a TextField to it as well.
- Add the HBox containing the CommandButtons
to it as well.
- Set the VBox's options.
| Example:
Using Method Calls on Variables |
 |
|| Using the variables v and h to represent the
|| VBox and HBox graphical objects respectively

||Create VBox and HBox
{value
    let v:VBox={VBox}
    let h:HBox={HBox spacing=6pt}

    ||Add two buttons to HBox
    {h.add {CommandButton label="OK"}}
    {h.add {CommandButton label="Cancel"}}

    ||Add text, TextField and HBox to VBox
    {v.add "Enter the name of a famous Curler: "}
    {v.add {TextField width=3in}}
    {v.add h}

    ||set the options of the VBox
    set v.spacing=6pt
    set v.margin=0.25in
    set v.background="silver"

    v
}
| |
| Summary: | Each instance of an object can occur only once in a graphic hierarchy. |
It is important to note that each graphic hierarchy with n objects
consists of n object instances. That is, none of the objects are
copies because there cannot exist multiple copies of the same object
in a graphic hierarchy. If you are using variables to represent
visual objects, each referenced variable points to a specific Visual
instance.
A common mistake you might make is to treat the adding of visual objects into
a graphic hierarchy the way you would think of adding copies of an
object to an array. If you attempt to add a visual object to a place in a
graphic hierarchy and the object is already in the graphic hierarchy, it
will be moved to its new location.
Refer to the following example. The
table (t) attempts to add two buttons to itself. The first
t.add call places the button in the first row's right table cell.
But because t then attempts to add the same button in a subsequent
call, the second t.add call pulls the button from the first row and
places it in the second row.
Hence the resulting table has only one button, and it ends up in the
right table cell of the second row.
| Example:
Trying to Add the Same Object Twice |
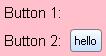 |
{value let b:CommandButton={CommandButton label="hello"}
    let t:Table={Table columns=2,
                    background="pink",
                    valign="center"}
    {t.add {text Button 1:}}
    {t.add b}
    {t.add {text Button 2:}}
    {t.add b}
    t
}
| |
The next example shows how you could add clones of a button
to a table. The code defines a procedure that creates a new
button each time it is called. Hence, this avoids the
behavior of pulling an object out of its current
position and placing it in another one in the graphic hierarchy.
| Example:
Adding Clones of an Object |
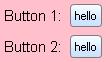 |
{define-proc public {another-b}:CommandButton
    {return {CommandButton label="hello"}}
}

{value let t:Table={Table columns=2,
                       background="pink",
                       valign="center"}
    {t.add {text Button 1:}}
    {t.add {another-b}}
    {t.add {text Button 2:}}
    {t.add {another-b}}
    t
}
| |
Copyright © 1998-2019 SCSK Corporation.
All rights reserved.
Curl, the Curl logo, Surge, and the Surge logo are trademarks of SCSK Corporation.
that are registered in the United States. Surge
Lab, the Surge Lab logo, and the Surge Lab Visual Layout Editor (VLE)
logo are trademarks of SCSK Corporation.